Chocolate Éclairs

Disclosure: This post may contain affiliate links. As an Amazon Associate, Satisfy Your Cravings earns from qualifying purchases. We may also participate in additional affiliate programs, accept sponsorships, or use other monetization methods throughout our site.
These partnerships help support our content and keep our recipes free for our amazing readers. We only recommend products and brands we personally use and trust in our own kitchen. Thank you for supporting us! 💛

✨ Irresistible Chocolate Éclairs You Can Make at Home

There’s something undeniably magical about biting into a freshly made chocolate éclair — that crisp yet tender choux shell, the smooth and creamy vanilla filling, and the rich, glossy ganache that melts in your mouth. It’s the kind of dessert that feels straight out of a French bakery, yet with this step-by-step recipe, you can recreate that indulgent experience right in your own kitchen.

Whether you’re baking for a holiday, brunch, or just because you deserve a treat (spoiler: you do!), these homemade chocolate éclairs will impress anyone who takes a bite. They’re easier than they look, endlessly customizable, and guaranteed to bring out your inner pastry chef. Let’s make something beautiful, delicious, and joy-filled — together. 🍫💛

Trio of piped éclairs topped with chocolate on cooling rack

🌱 Can I Make Gluten-Free or Dairy-Free Éclairs That Still Taste Amazing?

Absolutely — and they’re just as decadent, indulgent, and drool-worthy as the classic version! Whether you’re baking for allergies, food sensitivities, or clean-eating goals, gluten-free and dairy-free chocolate éclairs are totally doable — and totally delicious. 🙌

Gone are the days of sacrificing texture or flavor. With the right swaps and some smart baking strategies, you’ll create éclairs so good, your guests won’t even know they’re allergen-friendly. Let’s walk through exactly how to do it!


🌾 Gluten-Free Éclairs: Yes, It Works!

Choux pastry is surprisingly easy to make gluten-free because it relies more on steam and eggs for structure than gluten development — which is a total win for GF bakers.

✅ Best Gluten-Free Flour for Éclairs:

  • Use a high-quality gluten-free 1:1 baking flour blend with xanthan gum (like Bob’s Red Mill or King Arthur GF).

  • Avoid blends that are overly starchy or gritty — texture is key!

💡 Tips for Success:

  • Measure your flour by weight (in grams) for accuracy.

  • Let the dough rest for 10 minutes before piping — it helps hydrate the GF flour fully.

  • Bake slightly longer for a firmer shell that holds its shape.

🛒 Try this top-rated Gluten-Free Flour Blend we love its consistency and light texture.


🥛 Dairy-Free Éclairs: Totally Possible (and Delicious)

To make your éclairs dairy-free, you’ll need to swap butter, milk, cream, and chocolate — but the good news? There are incredible plant-based alternatives that perform beautifully.

✅ Dairy-Free Substitutes:

  • Butter: Use vegan butter (like Earth Balance or Miyoko’s). Coconut oil also works but changes flavor slightly.

  • Milk: Unsweetened oat milk, almond milk, or soy milk all work great in pastry cream and choux dough.

  • Cream: For ganache and custard, use full-fat canned coconut milk or plant-based heavy cream.

  • Chocolate: Opt for a high-quality dairy-free dark chocolate (60–70% cacao). Brands like Enjoy Life or Hu Kitchen are ideal.


🧁 How to Make Allergen-Friendly Éclairs Taste Just as Good

  1. Flavor It Up – Use real vanilla extract, espresso powder, or citrus zest to enhance flavor depth in both dough and filling.

  2. Go Slow with Heating – Vegan butter and plant milk can behave slightly differently when heated. Stir often and gently.

  3. Stabilize Your Custard – Add a little cornstarch or arrowroot to your dairy-free pastry cream to help it thicken properly.

  4. Watch the Chocolate – Some dairy-free chocolates melt faster. Keep heat low and stir often for silky ganache.


🍫 Sample Flavor Combo: Coconut-Vanilla Éclairs with Dark Chocolate Ganache

  • Choux Pastry: Made with GF flour + vegan butter

  • Custard Filling: Coconut milk vanilla pastry cream

  • Ganache: Melted dairy-free dark chocolate + coconut cream

  • Topping: Toasted coconut flakes (optional, but AMAZING)

These are light, rich, tropical, and gluten/dairy-free heaven in every bite.


📦 Best Tools & Ingredients for Allergy-Friendly Baking

To make your baking experience smoother, here are some tools we swear by for GF + DF success:


✅ Final Verdict: Yes, You Can Have It All!

You don’t need gluten or dairy to enjoy the magic of a rich, filled, ganache-topped éclair. With the right swaps and just a little extra care, your allergen-friendly éclairs can taste just as luxurious — maybe even more so — than the original.

Your éclairs. Your way. Every delicious bite made with love — and now, more inclusive than ever.

Two chocolate éclairs with vanilla filling on cooling rack

🧁 Can I Make Chocolate Éclairs Ahead of Time Without Them Getting Soggy?

Yes — and if you do it right, your éclairs will still taste like they came straight from a patisserie! The secret to making chocolate éclairs ahead of time without losing their signature crispness and creamy indulgence lies in how you prep, store, and assemble each component.

💡 The Best Way to Make Éclairs Ahead (Step-by-Step)

1. Make the choux pastry shells in advance
Once baked and cooled, unfilled choux shells can be stored at room temperature in an airtight container for 1–2 days. Want to keep them longer? Simply freeze them! Store in a freezer-safe bag or container for up to 2 months.

👉 To revive the crispness after freezing: Bake the shells at 300°F (150°C) for about 5–8 minutes, then let them cool before filling.

2. Store the pastry cream separately
Your vanilla custard filling should be made fresh but can be refrigerated for up to 3 days. Be sure to cover it tightly with plastic wrap (touching the surface) to prevent a skin from forming.

3. Assemble the éclairs right before serving
For the best taste and texture, pipe the filling and add the ganache topping on the day you plan to serve them. This prevents the moisture in the filling from softening the choux pastry too early.


🍫 Bonus Tips to Keep Éclairs Fresh & Fabulous

  • Don’t fill warm choux shells. Always cool them completely on a wire rack before filling. Otherwise, the steam inside will create soggy spots.

  • Add a small vent hole. After baking, poke a hole at the end of each éclair to release steam. This keeps them airy and prevents collapse.

  • Use high-quality chocolate for ganache. A shiny ganache made with real dark chocolate (60–70%) and cream not only looks gorgeous but also sets beautifully without melting or smearing during storage.


🛒 Tools to Help You Prep Like a Pro

If you’re planning to prep éclairs in batches, a few kitchen tools can make your process smoother and more consistent:

Using the right tools can make a big difference when prepping in advance. Your éclairs will not only look better but also hold their texture beautifully!


🗓️ Make-Ahead Magic: Perfect for Parties, Holidays & Brunches

Making éclairs ahead of time is a total game-changer when you’re entertaining. Prep the components a day or two before your event, and you’ll have an elegant, show-stopping dessert ready to go in minutes.

Just fill, glaze, and voilà — bakery-level éclairs that are ready to wow your guests with zero last-minute stress.

Try some of our other recipes!

❌ Why Did My Choux Pastry Collapse or Not Puff Up? (And How to Fix It Like a Pro)

If your éclairs turned out flat, soggy, or deflated after baking, don’t worry — you’re not alone! Making choux pastry (also known as pâte à choux) is more science than guesswork, but once you understand the why, it becomes much easier to get those perfectly puffed, golden éclairs every single time.

Let’s dive into the top reasons your choux pastry may collapse or not puff correctly — and how to fix each one 💡


🔍 1. Your Dough Was Too Wet or Undercooked

Choux pastry depends on steam to puff up in the oven. If the dough is too wet or wasn’t cooked long enough in the saucepan, it won’t create the right structure.

Fix:
When cooking your flour, butter, and water mixture, stir continuously until a film forms on the bottom of your saucepan and the dough pulls away cleanly from the sides. This step dries the dough — which is essential for structure!

🌡️ Use a wooden spoon or silicone spatula for even mixing and heat control.


🔍 2. You Added Eggs Too Quickly (or Too Many)

Eggs give choux its structure and lift, but too much will make the dough too runny. And if you add them before the dough cools slightly, they can scramble!

Fix:
Let your cooked dough cool for 5–10 minutes before adding the eggs. Add eggs one at a time, mixing thoroughly between each one until the dough forms a thick ribbon when lifted. The right consistency should be smooth, glossy, and pipeable — not runny.

🛒 Tip: Use a stand mixer or electric hand mixer [link] for easier, even incorporation.


🔍 3. Oven Temperature Was Off

Choux pastry needs an initial burst of high heat to create steam and rise. If your oven isn’t hot enough — or fluctuates too much — your éclairs won’t puff properly.

Fix:
Always preheat your oven to 400°F (200°C) and use an oven thermometer [link] to make sure it’s accurate. After 10 minutes, you can reduce the heat slightly, but don’t open the oven during baking!

🚫 Opening the door early = sudden temperature drop = collapsed pastries.


🔍 4. You Didn’t Bake Them Long Enough

Even if éclairs look golden, they might not be fully baked inside — which leads to soggy, collapsing shells once they cool.

Fix:
Bake until they are deep golden brown and feel firm to the touch. Most éclairs need 35–40 minutes, depending on size and your oven. Leave them in longer if they’re still pale or soft.

💨 After baking, pierce each éclair with a skewer or the tip of a knife to let out steam and prevent sogginess.


🔍 5. You Didn’t Use the Right Tools

Using parchment paper or a silicone baking mat and a sturdy piping bag ensures even shaping and airflow — both of which are key to achieving the perfect puff.

Fix:
Use a large round or open star piping tip to pipe evenly sized éclairs. If you’re using a baking tray, make sure it’s light-colored (dark pans can overbake the bottoms).

🛍️ Get our favorite piping set + baking mat bundle [link] for flawless results.


🧠 Bonus Troubleshooting Checklist:

  • ✅ Dough dries out in the pan before eggs go in

  • ✅ Eggs are added one at a time and mixed until glossy

  • ✅ Oven is fully preheated (no cold starts!)

  • ✅ You don’t open the door mid-bake

  • ✅ You bake until deep golden, not just “done enough”


❤️ Final Thought: Don’t Give Up — Choux Is a Skill!

If your éclairs collapsed, it’s not a fail — it’s just one step closer to mastering a timeless French technique that even professional pastry chefs took time to perfect.

Once you learn the feel of properly cooked choux dough and the rhythm of baking, you’ll be whipping up bakery-level éclairs anytime you crave them.

Confidence in the kitchen comes with every attempt. You’ve got this!

Four chocolate éclairs on parchment-lined wire cooling rack

✨ How Do You Get That Perfectly Shiny Chocolate Ganache for Éclairs?

That bakery-style mirror glaze on a chocolate éclair isn’t just eye candy — it’s a sign of a perfectly balanced ganache. Whether you’re hosting brunch, baking for a celebration, or simply craving an indulgent treat, that glossy chocolate topping can elevate your éclairs from homemade to pastry-chef level. The good news? It’s easier than you think when you follow a few key tips!

Let’s break down exactly how to make rich, shiny, silky-smooth ganache that clings beautifully to your éclairs and leaves everyone asking, “Where did you buy these?!”


🍫 The 3 Essential Ingredients for Ganache Success

A truly stunning ganache is all about simplicity and quality. Here’s what you need:

  • Chocolate: Use high-quality dark chocolate (ideally 60–70% cacao). Skip chocolate chips — they often contain stabilizers that prevent a smooth melt.

  • Heavy Cream: Choose full-fat, real heavy cream — this provides richness and helps emulsify the ganache.

  • Optional Butter or Corn Syrup: Just a teaspoon adds an irresistible glossy finish and keeps the ganache from drying or cracking.


🔥 How to Make the Perfect Ganache (Step-by-Step)

1. Heat the Cream Gently
Bring heavy cream to a bare simmer (small bubbles around the edges). Do NOT let it boil — this can scorch the cream and cause separation.

2. Pour Over the Chocolate
Place finely chopped chocolate in a heatproof bowl. Pour the hot cream over the chocolate, cover the bowl with a plate or lid, and let it sit for 1–2 minutes to soften.

3. Stir Gently Until Smooth
Use a silicone spatula or whisk to slowly stir the center in small circles until the mixture becomes silky, thick, and glossy. Add a teaspoon of butter or corn syrup now if desired.

4. Let It Cool Slightly Before Dipping
Cool for 5–10 minutes. It should still be pourable but not runny — the consistency should coat the back of a spoon.

👩‍🍳 Tip: Always dip éclairs upside-down into the ganache for the cleanest, most even coating.


🛠️ Tools That Make Ganache Effortless

To make your ganache routine foolproof, having the right tools on hand makes a huge difference:

🛍️ These tools help your éclairs look as good as they taste — and they’ll last you for years of beautiful baking!


💎 Pro Tips for That Bakery-Style Shine

  • Use chopped chocolate bars (not chips) for the smoothest melt.

  • Don’t over-stir — slow and steady wins the gloss.

  • Add butter or corn syrup if your ganache looks dull or grainy.

  • Dip while warm but not hot — the perfect temp helps it stick without running off.


🤎 Flavor Twist: Infused Ganache Ideas

Once you master the base, you can personalize your ganache with exciting flavor infusions:

  • Espresso powder for mocha éclairs

  • Orange zest or peppermint extract for a festive flair

  • Sea salt flakes for a salty-sweet finish

  • Hazelnut or almond extract for a nutty vibe

These twists are subtle but unforgettable — and your readers will LOVE experimenting!


💬 Final Takeaway

A beautiful ganache is more than just a topping — it’s the finishing touch that makes your éclairs unforgettable. With the right ingredients, temperature, and tools, your chocolate glaze will shine (literally) every single time.

Shiny ganache = bakery confidence in your own kitchen.

Whole chocolate éclair on a dessert plate with ganache drizzle

🥄 What’s the Best Filling for Éclairs — Custard, Cream, or Pudding?

When it comes to éclairs, the filling makes or breaks the experience. That first bite should give you everything: light choux pastry, silky-smooth center, and just the right sweetness. But what’s the best filling for éclairs — custard, cream, or pudding?

The truth? It depends on your texture preference, how far ahead you’re prepping, and the vibe you’re going for. Let’s break it down so you can choose the perfect match (or even switch it up for the season!).


💛 1. Classic Vanilla Pastry Cream (Crème Pâtissière)

This is the gold standard filling for traditional French éclairs — rich, creamy, and firm enough to pipe cleanly into the shell. It’s made from simple ingredients: egg yolks, sugar, cornstarch or flour, milk, butter, and real vanilla.

Why It’s Best:

  • Holds its shape perfectly when piped

  • Intensely flavorful with natural vanilla bean or extract

  • Stays stable for 1–2 days in the fridge

  • Makes your éclairs feel like they came from a Parisian patisserie 🇫🇷

✨ Want to make it lighter? Fold in whipped cream once the custard is chilled to create a mousse-like texture.

🛒 Use real vanilla bean paste [link] for a gourmet upgrade — it makes a huge difference in aroma and flavor.


🍦 2. Whipped Cream or Chantilly Cream

Light, airy, and incredibly fast to make, whipped cream is a popular alternative for those who want something less rich and more pillowy. Add powdered sugar and vanilla for flavor.

Why Choose It:

  • Quick to prepare — no stovetop required

  • Pairs beautifully with dark chocolate or fruit-flavored glazes

  • Makes a great summer or brunch-time option

⚠️ Heads up: It doesn’t hold as long. Use it only if you’re serving the éclairs within a few hours — and store them chilled at all times.

💡 Upgrade with stabilized whipped cream (add a little gelatin or cream cheese) for better texture and shelf life.


🍫 3. Instant Pudding (Yes, It’s an Option!)

Surprisingly, a lot of beginner bakers turn to instant pudding mixes to fill éclairs, especially if they’re in a rush or baking with kids. You can make it richer by using less milk or folding in whipped cream.

Why It Works:

  • Incredibly easy

  • No cooking required

  • Flavor options like chocolate, banana, coconut, etc.

However, it lacks the depth and silky mouthfeel of real custard or whipped cream. It’s more like a quick fix than a showstopper.

📌 If you’re going this route, we recommend using organic or natural pudding mixes to avoid artificial aftertastes.


🎨 4. Creative Filling Ideas (When You Want to Stand Out)

Once you’ve mastered the basic custard, it’s fun to play with seasonal or gourmet flavor twists:

  • Mocha Custard: Add instant espresso to your vanilla base

  • Raspberry or Strawberry Cream: Blend in fruit purée

  • Chocolate Pastry Cream: Swap some of the milk for melted dark chocolate

  • Salted Caramel Cream: Drizzle caramel into your custard for sweet-salty contrast

  • Pumpkin Spice Cream: Fall-perfect with cinnamon glaze on top

👩‍🍳 These filling ideas are great for holidays, birthdays, brunch spreads, or when you want your éclairs to really wow.


📦 So… Which Éclair Filling Should You Choose?

FillingFlavorTextureShelf LifeBest For
Pastry CreamRich, classicSmooth, thick2–3 daysTraditional éclairs, holidays
Whipped CreamLight, airySoft, fluffyA few hoursSummer desserts, brunch
Instant PuddingMild, sweetSoft-set1–2 daysQuick fixes, family-style baking
Flavored VariationsCustomizableVaries1–3 daysSeasonal, themed, or gourmet éclairs

💬 Final Thoughts: The Best Filling Is the One You Love Most

Whether you love the luxurious spoonful of real pastry cream or the cloud-like simplicity of whipped cream, what matters most is the love and intention you put into the baking process.

Want that Parisian éclairs experience? Go for classic crème pâtissière.
Craving something light and fun? Whipped cream it is.
In a rush? Pudding saves the day.

No matter your choice, your éclairs will taste like joy.

Chocolate éclair with vanilla custard filling on plate and coffee in background

🛠️ Can I Make Chocolate Éclairs Without a Piping Bag?

Yes, you absolutely can make chocolate éclairs without a piping bag — but there’s a big difference between just getting the job done and getting that gorgeous, bakery-style éclairs finish. If you’re short on tools but big on ambition, you can still whip up impressive éclairs using some clever kitchen hacks and a few tips to make your life easier.

That said, if you plan on making éclairs (or any choux pastry) more than once, investing in a proper piping set is a game-changer you’ll never regret — and I’ll show you exactly why below. 😊


🧑‍🍳 No Piping Bag? No Problem (Here’s What to Do Instead)

If you don’t have a piping bag on hand, don’t panic — all you need is:

  • A large zip-top freezer bag (gallon size works best)

  • A sharp pair of scissors

  • A steady hand 😅

How to DIY It:

  1. Fill the zip-top bag with your cooled choux pastry dough.

  2. Push the dough into one corner of the bag.

  3. Snip off about a ½-inch opening in the corner — this will be your makeshift piping tip.

  4. Pipe your éclair shapes directly onto parchment-lined baking sheets.

💡 Optional Tip: Use a ruler or template underneath your parchment paper to guide the length and spacing. Aim for 4 to 5-inch long éclairs with consistent width for even baking.


✨ Why Using a Real Piping Bag Makes a HUGE Difference

While a zip-top bag can work in a pinch, here’s what you might run into without a piping tip:

❌ Uneven éclairs
❌ Inconsistent baking
❌ Lumpy or flat shapes
❌ Ganache topping sliding off because of irregular height

With a reusable piping bag + large round or star tip, you’ll get:

✅ Even pressure and piping control
✅ Professional presentation (hello, Insta-worthy éclairs 😍)
✅ Even baking and rising
✅ Faster, cleaner prep


🛍️ Recommended Tools to Elevate Your Éclair Game

Want your éclairs to look and taste like they came from a patisserie? These are our top must-haves:

These tools are affordable, beginner-friendly, and make you feel like a baking boss — whether you’re doing éclairs, cream puffs, or even savory choux appetizers!


🎨 Want Fancy Éclairs? Try These Piping Tips

Use a large round tip for traditional smooth éclairs, or try a French star tip to create ridged éclairs that bake more evenly and hold ganache better. The ridges aren’t just beautiful — they also help prevent cracking in the oven.

🎯 Bonus: Ridged éclairs look extra professional and make glazing easier because the ganache clings perfectly!


💬 Final Takeaway: Yes, You Can… But Should You?

If it’s your first time making éclairs and you don’t have a piping bag, go for it with your DIY method — no judgment, just joy! But if you want consistent, photo-worthy results and easier cleanup, adding a proper piping set to your kitchen is one of the smartest little upgrades you’ll ever make.

Beautiful éclairs aren’t just about ingredients — they’re about the confidence that comes from the right tools in your hands.

♻️ How Do I Store Leftover Éclairs Without Losing Flavor or Texture?

If you’ve put the love and time into making homemade chocolate éclairs, the last thing you want is for them to go soggy, lose their silky filling, or develop a dull chocolate glaze. The good news? With the right storage methods, you can preserve that same fresh-from-the-bakery quality for up to several days — and even prep parts of your éclairs ahead of time.

Here’s how to store, revive, and even freeze éclairs without sacrificing their texture, taste, or beauty. 🍫✨


🧊 Step-by-Step: How to Store Éclairs the Right Way

1. Let Them Cool Completely First
Before storing, always allow your filled and glazed éclairs to cool fully. This prevents steam from building up inside the container, which causes sogginess.

2. Store in a Single Layer
Place éclairs in a single layer in an airtight container. If you stack them, the ganache will smudge, and the pastry will lose its structure.

3. Refrigerate for Up to 3 Days
Store filled éclairs in the fridge for up to 72 hours. The cool temperature keeps the custard fresh, but after the first 24 hours, the shell will gradually soften.

🧡 Serving tip: Let refrigerated éclairs sit at room temperature for 10–15 minutes before enjoying for best texture and flavor.


🚫 What NOT to Do When Storing Éclairs

  • ❌ Don’t store warm éclairs — steam will soften the shell.

  • ❌ Don’t freeze fully assembled éclairs — the filling and glaze won’t thaw well.

  • ❌ Don’t leave them out overnight — the dairy-based custard can spoil quickly.

  • ❌ Don’t cover them with foil or plastic wrap directly — it will stick to the chocolate glaze and ruin the finish.


💡 How to Keep Choux Pastry Shells Crisp (Unfilled)

Want to prep in advance? Bake the shells, cool them, and store them separately. Here’s how:

  • Room Temperature: Unfilled éclairs can be stored in an airtight container at room temp for up to 24 hours.

  • Freezer: For longer storage, freeze unfilled shells for up to 2 months. When ready to use, reheat at 300°F for 5–8 minutes to crisp them up again.

👩‍🍳 This is the ideal method for party prep, brunch events, or making éclairs in bulk.


🧰 Recommended Storage Tools for Better Results

Want to protect your éclairs and keep them picture-perfect? Use the right containers and tools to help extend freshness:

These simple tools help prevent sticky ganache, soggy bottoms, and awkward stacking — making your storage solutions as elegant as the dessert itself.


🔁 Can You Reheat Éclairs?

Yes — but only if they’re unfilled.

To Reheat Unfilled Shells:
Place them in a preheated 300°F (150°C) oven for 5–8 minutes. This helps bring back their crisp texture. Allow them to cool completely before filling and glazing.

⚠️ Never reheat filled éclairs — the pastry cream can curdle or leak, and the chocolate glaze may melt or separate.


📝 Storage Timeline at a Glance

StageStorage MethodShelf LifeTips
Unfilled shells (room temp)Airtight container24 hoursKeep in single layer, cool fully first
Unfilled shells (frozen)Freezer-safe bag or box2 monthsReheat before filling
Filled & glazed éclairsAirtight container in refrigerator2–3 daysBest eaten within 24 hours

💬 Final Thoughts: Don’t Let Your Hard Work Go to Waste

Éclairs are best eaten fresh, but with a little planning and the right storage know-how, you can enjoy them days later without sacrificing quality. From freezing shells in advance to reviving them before serving, mastering éclair storage gives you flexibility, freedom, and flawless results.

Your homemade éclairs deserve to stay delicious — from the first bite to the last.

Bitten chocolate éclair on white plate with dripping ganache

🌱 Can I Make Gluten-Free or Dairy-Free Éclairs That Still Taste Amazing?

Absolutely — and they’re just as decadent, indulgent, and drool-worthy as the classic version! Whether you’re baking for allergies, food sensitivities, or clean-eating goals, gluten-free and dairy-free chocolate éclairs are totally doable — and totally delicious. 🙌

Gone are the days of sacrificing texture or flavor. With the right swaps and some smart baking strategies, you’ll create éclairs so good, your guests won’t even know they’re allergen-friendly. Let’s walk through exactly how to do it!


🌾 Gluten-Free Éclairs: Yes, It Works!

Choux pastry is surprisingly easy to make gluten-free because it relies more on steam and eggs for structure than gluten development — which is a total win for GF bakers.

✅ Best Gluten-Free Flour for Éclairs:

  • Use a high-quality gluten-free 1:1 baking flour blend with xanthan gum (like Bob’s Red Mill or King Arthur GF).

  • Avoid blends that are overly starchy or gritty — texture is key!

💡 Tips for Success:

  • Measure your flour by weight (in grams) for accuracy.

  • Let the dough rest for 10 minutes before piping — it helps hydrate the GF flour fully.

  • Bake slightly longer for a firmer shell that holds its shape.

🛒 Try this top-rated Gluten-Free Flour Blend – we love its consistency and light texture.


🥛 Dairy-Free Éclairs: Totally Possible (and Delicious)

To make your éclairs dairy-free, you’ll need to swap butter, milk, cream, and chocolate — but the good news? There are incredible plant-based alternatives that perform beautifully.

✅ Dairy-Free Substitutes:

  • Butter: Use vegan butter (like Earth Balance or Miyoko’s). Coconut oil also works but changes flavor slightly.

  • Milk: Unsweetened oat milk, almond milk, or soy milk all work great in pastry cream and choux dough.

  • Cream: For ganache and custard, use full-fat canned coconut milk or plant-based heavy cream.

  • Chocolate: Opt for a high-quality dairy-free dark chocolate (60–70% cacao). Brands like Enjoy Life or Hu Kitchen are ideal.

🛍️ Need help choosing? Here’s our go-to vegan baking kit with all the essentials.


🧁 How to Make Allergen-Friendly Éclairs Taste Just as Good

  1. Flavor It Up – Use real vanilla extract, espresso powder, or citrus zest to enhance flavor depth in both dough and filling.

  2. Go Slow with Heating – Vegan butter and plant milk can behave slightly differently when heated. Stir often and gently.

  3. Stabilize Your Custard – Add a little cornstarch or arrowroot to your dairy-free pastry cream to help it thicken properly.

  4. Watch the Chocolate – Some dairy-free chocolates melt faster. Keep heat low and stir often for silky ganache.


🍫 Sample Flavor Combo: Coconut-Vanilla Éclairs with Dark Chocolate Ganache

  • Choux Pastry: Made with GF flour + vegan butter

  • Custard Filling: Coconut milk vanilla pastry cream

  • Ganache: Melted dairy-free dark chocolate + coconut cream

  • Topping: Toasted coconut flakes (optional, but AMAZING)

These are light, rich, tropical, and gluten/dairy-free heaven in every bite.


📦 Best Tools & Ingredients for Allergy-Friendly Baking

To make your baking experience smoother, here are some tools we swear by for GF + DF success:


✅ Final Verdict: Yes, You Can Have It All!

You don’t need gluten or dairy to enjoy the magic of a rich, filled, ganache-topped éclair. With the right swaps and just a little extra care, your allergen-friendly éclairs can taste just as luxurious — maybe even more so — than the original.

Your éclairs. Your way. Every delicious bite made with love — and now, more inclusive than ever.

Trio of piped éclairs topped with chocolate on cooling rack

🥐 What’s the Difference Between Éclairs and Cream Puffs? (And Which One Should You Make?)

They may share the same delicious dough — pâte à choux — but éclairs and cream puffs are two distinct desserts, each with their own vibe, texture, and iconic style. If you’ve ever wondered whether you’re team éclair or team cream puff (or want to master both), this guide will break down the key differences — and help you bake like a true pastry pro.

Let’s settle the debate and explore what makes each one unique, from shape and filling to their sweet finishing touches.


🍩 1. Same Dough, Different Shape

At their core, both éclairs and cream puffs use pâte à choux, a magical French pastry dough made from butter, water, flour, and eggs. The dough relies on steam (not yeast or baking powder) to puff up into hollow, airy shells.

So what’s the main difference?

  • Éclairs are piped into long, slender shapes — typically 4 to 5 inches in length

  • Cream puffs (also called profiteroles) are piped into round mounds, like little pastry clouds

🎯 Shape affects texture and function — éclairs have a more structured bite, while cream puffs are soft and fluffy inside.


🍮 2. Different Fillings = Different Flavors

While both pastries can be filled with sweet creams, their fillings are traditionally different:

  • Éclairs are usually filled with pastry cream (crème pâtissière), a rich vanilla custard. Modern twists may include coffee, chocolate, or fruit-flavored variations.

  • Cream puffs are most often filled with lightly sweetened whipped cream or even ice cream (especially when served frozen or with hot chocolate sauce).

💡 Want the best of both worlds? Try filling cream puffs with pastry cream and topping them with a dusting of powdered sugar!


🍫 3. The Topping Says It All

The classic éclair is topped with a glossy chocolate ganache glaze — this is a signature visual that sets it apart. Some bakers get creative with flavored glazes (caramel, matcha, raspberry, etc.), but that shiny chocolate finish is iconic.

Cream puffs? They tend to keep it simple:

  • Light dusting of powdered sugar

  • Occasionally served plain

  • For profiteroles: served with a warm chocolate drizzle over ice cream-filled puffs

🍨 Profiteroles are technically cream puffs — but elevated for dessert lovers who adore hot-cold contrast!


📐 4. The Experience: Texture & Occasion

FeatureÉclairsCream Puffs
ShapeLong & oblongRound & puffy
FillingCustard/pastry creamWhipped cream or ice cream
ToppingChocolate ganache or flavored glazePowdered sugar or chocolate drizzle
TextureCrisp shell with creamy interiorLight, airy, soft bite
Best ForFormal occasions, high-tea, giftingCasual desserts, parties, frozen treats

Éclairs tend to feel more elegant and structured, while cream puffs are light-hearted and versatile.


🛠️ Want to Try Both? Here’s What You’ll Need

The best part? Once you master pâte à choux, you can make both desserts using the same core ingredients and just a few piping tweaks.

🛍️ Recommended Tools:

💬 Pro Tip: You can pipe cream puffs using a star tip for more even expansion and a professional look.


👩‍🍳 Which One Should You Make?

Make Éclairs If You Want:

  • A fancier, bakery-style presentation

  • More structure and contrast between textures

  • A rich custard filling with a decadent ganache topping

Make Cream Puffs If You Want:

  • Something light, fluffy, and easy to serve

  • A chilled, refreshing dessert (especially with ice cream!)

  • A beginner-friendly treat with room to experiment


🧁 Final Thought: Why Not Master Both?

Éclairs and cream puffs are like culinary cousins — different personalities, same delicious DNA. Master one and you’re 90% of the way to mastering the other. If you’re already making éclairs with this recipe, challenge yourself to try cream puffs next — your friends, family, and taste buds will thank you!

Whether you’re craving indulgence or airy sweetness, pâte à choux has you covered — one bake, endless possibilities.

🧁 Can I Make Mini Éclairs with This Recipe? (Spoiler: You Absolutely Should!)

Yes — and they’re as adorable as they are addictive! Turning your classic chocolate éclairs into mini éclairs is not only totally doable, it’s a brilliant idea for parties, holidays, brunch tables, baby showers, dessert buffets, or even gifting. With just a few small tweaks to your piping and baking process, you can transform this same recipe into bite-sized French treats that make a big impression.

Let’s walk through exactly how to adjust your ingredients, baking time, and tools for a mini éclair moment your guests (or family) will never forget. 🥳✨


🍬 Why You’ll Love Mini Éclairs

  • Perfect Portion Control – All the flavor, half the size, zero guilt 😉

  • Kid-Friendly & Party-Ready – Easy to serve and even easier to eat

  • Faster Baking & Cooling Time – Minis mean quicker results

  • Customization Heaven – Mix and match fillings, glazes, and toppings

  • They Freeze Beautifully – More on that below!

Mini éclairs offer maximum elegance with minimal effort — they’re the kind of treat that makes people stop and say, “You made these?!”


✏️ How to Make Mini Éclairs Step-by-Step

1. Use the Same Dough
No need to change the pâte à choux recipe — it’s already perfect! You’ll just pipe smaller shapes.

2. Adjust Your Piping Tip
Use a medium round tip or small French star tip for best results. Your éclairs should be about 2–3 inches long, and thinner than traditional ones.

3. Bake at the Same Temperature — But Watch the Time
Preheat your oven to 400°F (200°C). Bake mini éclairs for 18–22 minutes, or until they are puffed, deeply golden, and sound hollow when tapped.

4. Cool & Poke
Once baked, poke a small hole in each to release steam. Let them cool completely on a wire rack before filling.


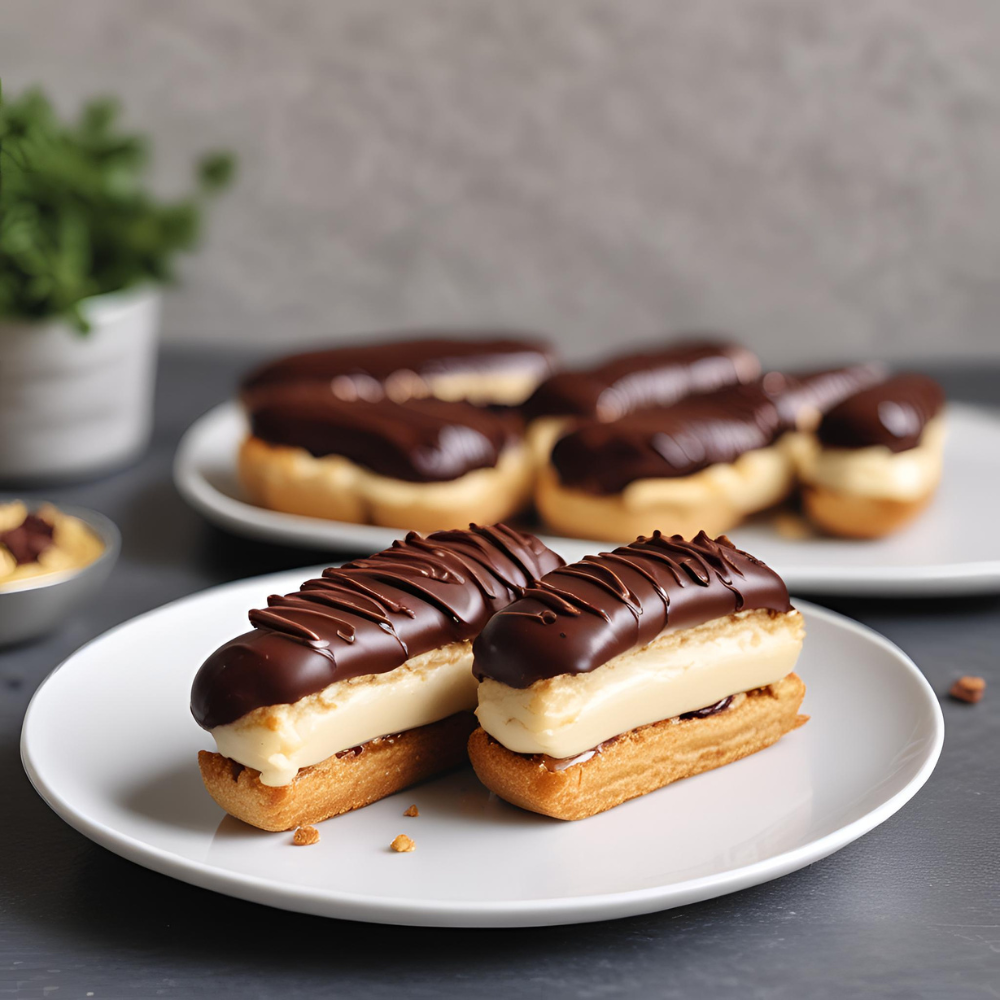
🧁 Filling & Glazing Mini Éclairs

Mini éclairs are super versatile — here’s how to make them unforgettable:

Filling Ideas:

  • Classic vanilla pastry cream (just pipe less per éclair)

  • Whipped chocolate mousse or ganache

  • Raspberry or lemon curd for a fruity twist

  • Espresso custard for a mocha moment

💡 Use a small piping tip to fill mini éclairs from the ends or bottom — it’s quick and mess-free.

Glaze Ideas:

  • Classic shiny chocolate ganache

  • White chocolate with sprinkles

  • Caramel glaze + sea salt

  • Matcha white chocolate for a trendy green look

  • Strawberry glaze + freeze-dried berries

🎨 This is your chance to get creative — mix and match glazes and fillings for a colorful, elegant dessert tray.


🛍️ Best Tools for Mini Éclair Success

If you’re going small, precision matters! Here are our go-to tools to make mini éclairs fun and easy:

✨ Using the right-sized tools makes a big difference in shaping, baking, and filling mini éclairs with ease.


🧊 Can I Freeze Mini Éclairs?

Yes! In fact, mini éclairs are even easier to freeze and revive than full-sized ones.

To Freeze:

  • Freeze unfilled shells in an airtight container or freezer bag for up to 2 months

  • Re-crisp in a 300°F oven for 5–8 minutes before filling and glazing

  • Freeze filled (but unglazed) éclairs on a tray, then store in layers separated by parchment paper

To Serve from Frozen:

  • Thaw in fridge overnight

  • Glaze with ganache right before serving for that freshly made finish


🍽️ Perfect Occasions for Mini Éclairs

  • Baby & bridal showers

  • Afternoon tea spreads

  • Dessert charcuterie boards

  • Wedding dessert tables

  • Birthday parties

  • Holiday cookie swaps

  • Teacher gifts or edible favors

💬 Mini éclairs are the sweet detail that makes your gathering feel extra special — and trust us, they disappear fast!


❤️ Final Thoughts: Small Size, Big Impact

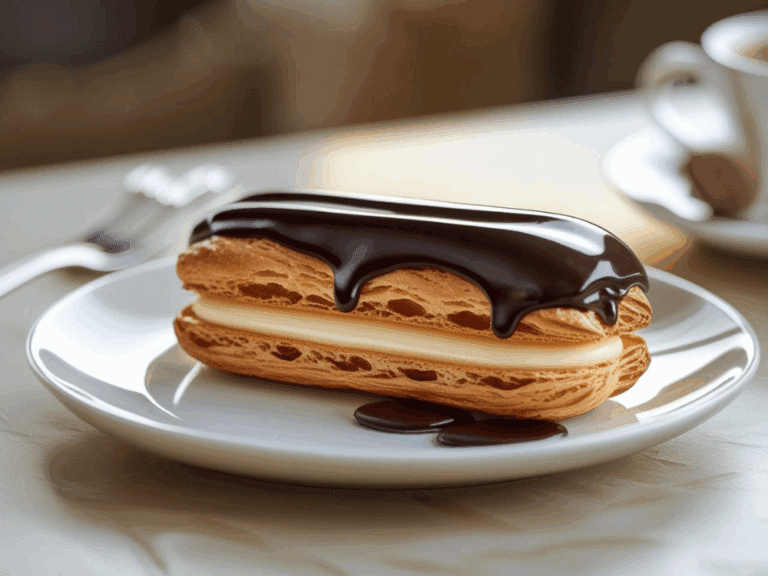
Mini éclairs are proof that great things come in small packages. Whether you’re serving them at a celebration or simply want a bite-sized indulgence with your coffee, they offer elegance, versatility, and pure joy — all from the same recipe you already know and love.

✨ Tiny éclairs, major compliments. Try them once and they’ll be a go-to for every event!

Emerald Isle Gin Fizz Cocktail
Roasted Cauliflower and Chickpea Wraps
Irish-Inspired Veggie Stew
Cinnamon Crescent Rolls
Summer Sangria
Chocolate-Dipped Oranges with Sea Salt
Disclosure: This post may contain affiliate links. As an Amazon Associate, Satisfy Your Cravings earns from qualifying purchases. We may also participate in additional affiliate programs, accept sponsorships, or use other monetization methods throughout our site.
These partnerships help support our content and keep our recipes free for our amazing readers. We only recommend products and brands we personally use and trust in our own kitchen. Thank you for supporting us! 💛

🛠️ Top 5 Must-Have Tools for Making Perfect Chocolate Éclairs

If you want your homemade éclairs to look (and taste) like they came from a professional pâtisserie, you need more than just good ingredients — you need the right tools. These five kitchen essentials are game-changers for choux pastry, silky pastry cream, and flawless ganache glaze.

Here’s exactly what we use — and why these tools are worth every penny 🧁✨


✅ 1. Reusable Piping Bags with Large Star & Round Tips

💬 “Effortless piping, perfect éclairs every time.”

Piping is key to shaping your éclairs consistently and cleanly. A reusable silicone piping bag gives you better control and grip, while the large round tip ensures even, smooth éclairs. Want that bakery-style ridged look? Use the French star tip for crisp edges and even baking.

🛒 Top Pick on Amazon:
👉 Reusable Piping Bag Set with Large Star & Round Tips – ★★★★☆


✅ 2. Baking Sheet + Silicone Baking Mat

💬 “Even baking, no sticking, no stress.”

A durable, flat baking sheet paired with a silicone baking mat helps your choux pastry bake evenly with zero sticking. Silicone mats prevent burnt bottoms and eliminate the need for parchment — plus they’re easy to clean.

🛒 Top Pick on Amazon:
👉  Stainless Steel Sheet with Silicone Mat – ★★★★★ 


✅ 3. Digital Kitchen Scale

💬 “Consistent results start with accurate measurements.”

Baking is science — and precision matters. A digital scale helps you measure flour, butter, and liquids exactly, so your choux dough puffs up perfectly and your filling sets just right.

🛒 Top Pick on Amazon:
👉 GreaterGoods Digital Food Scale – ★★★★★ 


✅ 4. Whisk + Heatproof Mixing Bowls

💬 “No lumps, no curdles — just creamy, dreamy custard.”

You’ll need a reliable whisk and heatproof bowl combo for making the pastry cream and melting ganache. These tools prevent scorching and give you full control over texture and temperature.

🛒 Top Pick on Amazon:
👉 Pyrex 3-Piece Mixing Bowl Set – ★★★★★
👉 Balloon Whisk Stainless Steel Set – ★★★★☆


✅ 5. Cooling Rack

💬 “Keeps éclairs crisp underneath and cools evenly.”

After baking, your éclairs need airflow to prevent sogginess. A cooling rack ensures they cool properly, and it’s also the perfect spot to let your ganache set without smudging.

🛒 Top Pick on Amazon:
👉 Checkered Chef Cooling Rack Set (Stainless Steel) – ★★★★★ 


🌟 Why We Recommend These Tools (and Why You’ll Love Them)

We’ve tested dozens of baking tools over the years, and these are the five that consistently deliver professional results at home. Whether you’re baking for your family, prepping a holiday dessert, or trying éclairs for the first time, these tools give you the confidence to succeed.

✨ They’re:

  • Beginner-friendly and durable

  • Affordable and multipurpose

  • Trusted by thousands of home bakers

  • Available on Amazon with fast shipping

💬 When your tools work with you — not against you — baking becomes joyful, stress-free, and even Instagram-worthy.

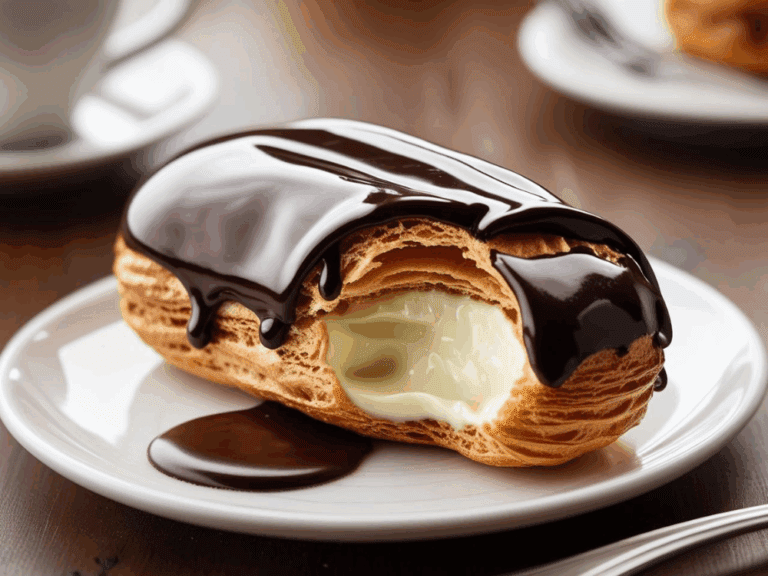
Chocolate Eclairs Recipe

Discover the ultimate guide to making perfect homemade chocolate éclairs with our detailed recipe. Featuring crisp choux pastry, rich pastry cream filling, and a glossy chocolate glaze, these classic French pastries are a delight for any dessert lover. Explore variations like fruit-filled, nutty, and even boozy éclairs to impress your guests and satisfy your sweet cravings. Visit SatisfyYourCravings.com for the full recipe and step-by-step instructions. #ChocolateEclairs #DessertRecipes #FrenchPastry #SatisfyYourCravings
Servings 10
Prep Time 30 minutes
Cook Time 35 minutes
Total Time 1 hour 5 minutes

Equipment

  • Measuring Cups and Spoons: For accurate ingredient measurements.
  • Kitchen Scale: Optional, but helpful for precise measurements.
  • Medium Saucepan: For making choux pastry and heating milk for pastry cream.
  • Mixing Bowls: Various sizes for mixing ingredients.
  • Whisk: For mixing pastry cream and eggs.
  • Wooden Spoon: For stirring the choux pastry dough.
  • Piping Bag with Large Round Tip: For piping the choux pastry dough and filling the éclairs.
  • Baking Sheet: For baking the choux pastry.
  • Parchment Paper or Silicone Baking Mat: To line the baking sheet.
  • Cooling Rack: For cooling the éclairs.
  • Small Knife: For making holes in the éclairs for filling.
  • Heatproof Bowl: For melting chocolate for the glaze.
  • Spoon or Small Offset Spatula: For spreading the chocolate glaze.
  • Plastic Wrap: To cover the pastry cream while it chills.

Ingredients

For the Choux Pastry

  • 1 Cup Water
  • 1/2 Cup Unsalted butter
  • 1/4 Tsp Salt
  • 1 Cup All-purpose flour
  • 4 Large eggs

For the Pastry Cream Filling

  • 2 Cups Whole milk
  • 1/2 Cup Granulated sugar
  • 1 Vanilla bean, split lengthwise
  • 5 Large egg yolks
  • 1/4 Cup Cornstarch
  • 2 Tbsp Unsalted butter

For the Chocolate Glaze

  • 1/2 Cup Heavy cream
  • 4 Oz Semi-sweet chocolate, finely chopped
  • 2 Tbsp Unsalted butter

Instructions

Making the Choux Pastry

  • Preheat and Prepare:
    Preheat your oven to 425°F (220°C). Line a baking sheet with parchment paper or a silicone baking mat.
  • Heat Ingredients:
    In a medium saucepan, combine water, butter, and salt. Bring to a boil over medium heat.
  • Add Flour:
    Remove the saucepan from heat and add the flour all at once, stirring vigorously until the mixture forms a ball and pulls away from the sides of the pan.
  • Cool and Add Eggs:
    Let the dough cool for 5 minutes. Add the eggs one at a time, beating well after each addition until the dough is smooth and shiny.
  • Pipe the Dough:
    Transfer the dough to a piping bag fitted with a large round tip. Pipe 4-inch long strips onto the prepared baking sheet.
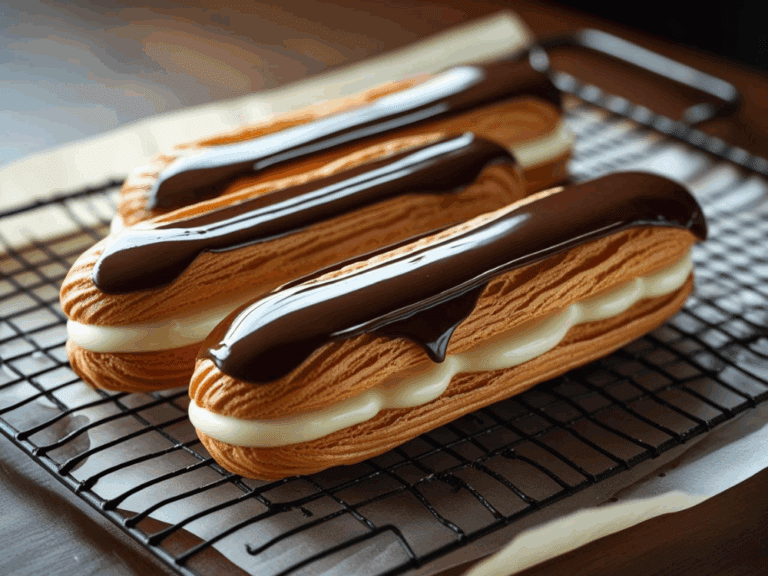
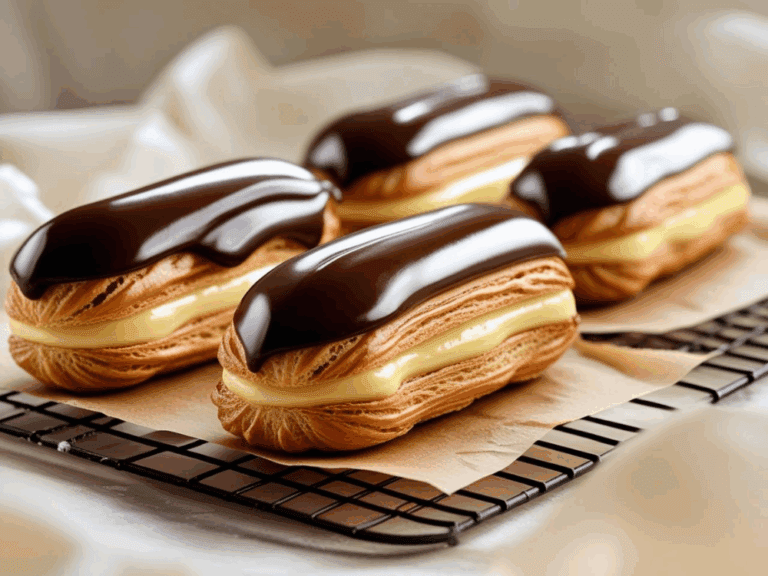
  • Bake:
    Bake for 15 minutes, then reduce the oven temperature to 375°F (190°C) and bake for an additional 20 minutes or until the éclairs are golden brown and puffed. Do not open the oven door during baking. Cool on a wire rack.

Making the Pastry Cream

  • Heat Milk and Vanilla:
    In a medium saucepan, heat the milk, half of the sugar, and the vanilla bean over medium heat until simmering.
  • Whisk Egg Yolks and Sugar:
    In a separate bowl, whisk together the egg yolks, remaining sugar, and cornstarch until smooth and pale.
  • Temper the Eggs:
    Slowly pour the hot milk mixture into the egg yolk mixture, whisking constantly to prevent curdling.
  • Cook and Thicken:
    Return the mixture to the saucepan and cook over medium heat, whisking constantly, until it thickens and comes to a boil.
  • Cool and Add Butter:
    Remove from heat, discard the vanilla bean, and stir in the butter until melted. Transfer the pastry cream to a bowl, cover with plastic wrap touching the surface, and chill until ready to use.

Making the Chocolate Glaze

  • Heat Cream:
    In a small saucepan, heat the heavy cream until just simmering.
  • Melt Chocolate:
    Place the chopped chocolate in a heatproof bowl and pour the hot cream over it. Let sit for 1 minute, then stir until smooth.
  • Add Butter:
    Stir in the butter until melted and the glaze is shiny.

Assembling the Éclairs
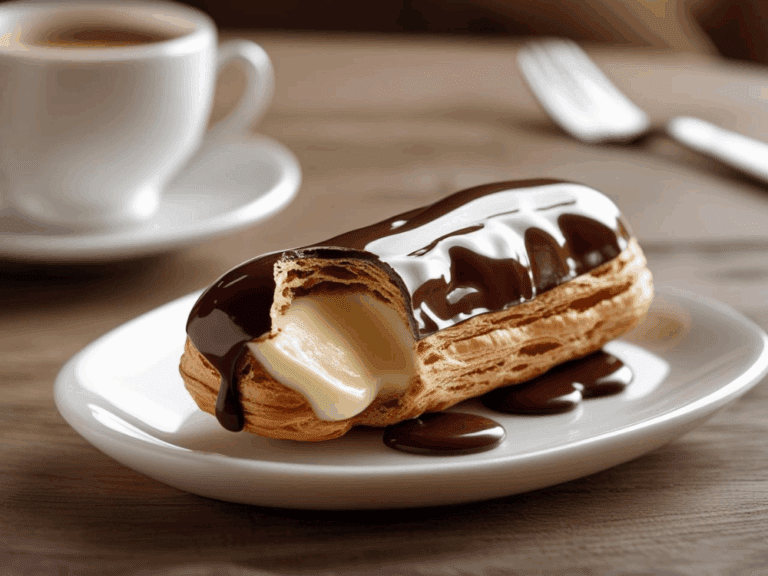
  • Fill the Éclairs:
    Using a small knife, make a small hole at each end of the éclairs. Fill a piping bag fitted with a small round tip with the pastry cream. Pipe the cream into each éclair until full.
  • Glaze the Éclairs:
    Dip the top of each éclair into the chocolate glaze, allowing the excess to drip off. Place the éclairs on a wire rack to set.
Author: Max Dennison
Calories: 350kcal
Course: Dessert
Cuisine: French cuisine
Keyword: best éclair recipe, chocolate éclairs recipe, classic French éclair recipe, easy éclair recipe, French desserts to make at home, ganache topping for éclairs, homemade chocolate éclairs, how to make éclairs, pâte à choux recipe, vanilla pastry cream filling
Four chocolate éclairs on parchment-lined wire cooling rack

🍫 Bringing a Little French Magic to Your Kitchen

There’s something so special about making chocolate éclairs from scratch — the aroma of freshly baked choux pastry, the creamy vanilla filling, the glossy chocolate glaze coming together in perfect harmony. Whether it’s your first time trying a French dessert or you’re a seasoned baker looking to refine your skills, this recipe invites you to slow down, savor the process, and create something beautiful.

We hope this recipe brings joy to your home and becomes one you return to again and again — for birthdays, celebrations, or quiet moments of sweet indulgence.

💬 If you made these éclairs, we’d love to hear how they turned out! Leave a comment below or tag us on Instagram @satisfyyourcravings24 — your kitchen creations make our day! 🥰

Join Now!

❤️ Love this recipe? Don’t miss out on even more delicious, healthy, and easy-to-make recipes like these chocolate éclairs!

🍽️ By joining our email community, you’ll gain exclusive access to bonus content, printable recipes, and clean eating tips that make healthy living a breeze.

📬 Enter your email & click below to subscribe — it only takes a minute to join our growing community of food lovers who believe healthy should still taste amazing!

Subscribe to our newsletter today to receive our exclusive printable weekly meal planner and recipe cards absolutely FREE.
Thank you for subscribing!
This post may contain affiliate links and other forms of monetization. As an Amazon Associate, we earn from qualifying purchases. Thank you for your support!
Close
Your custom text © Copyright 2026. All rights reserved.
Close
SiteLock