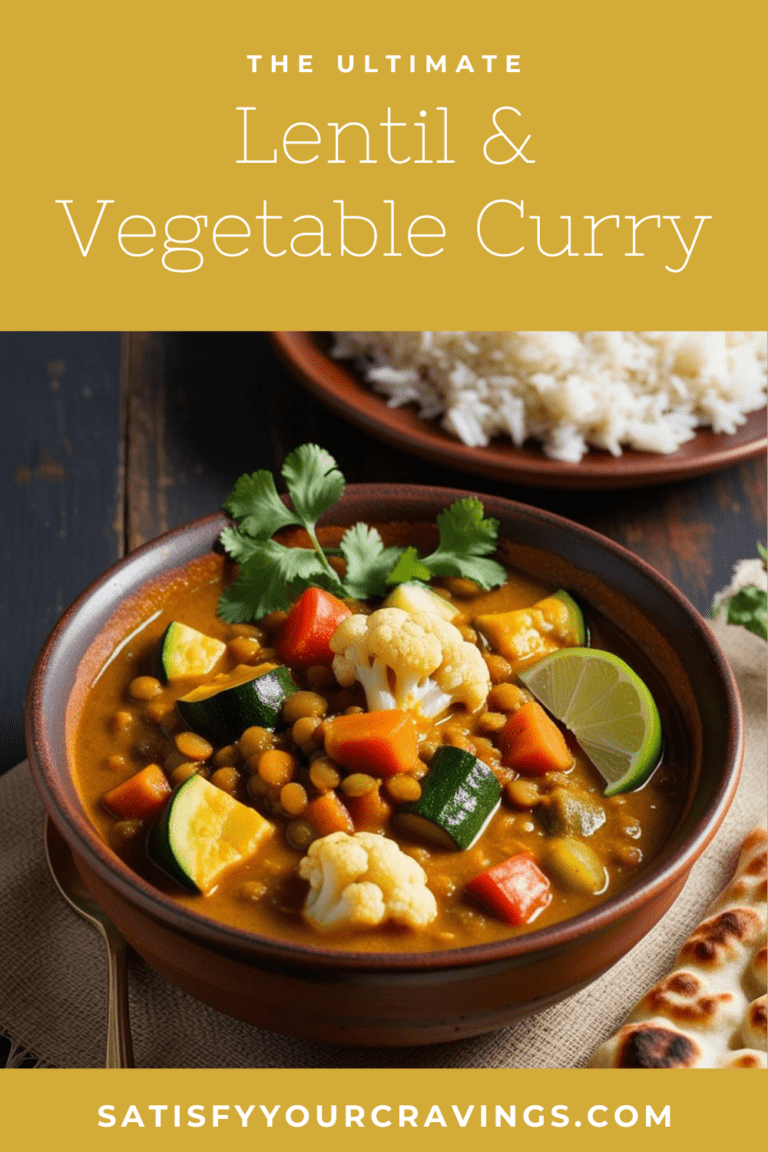
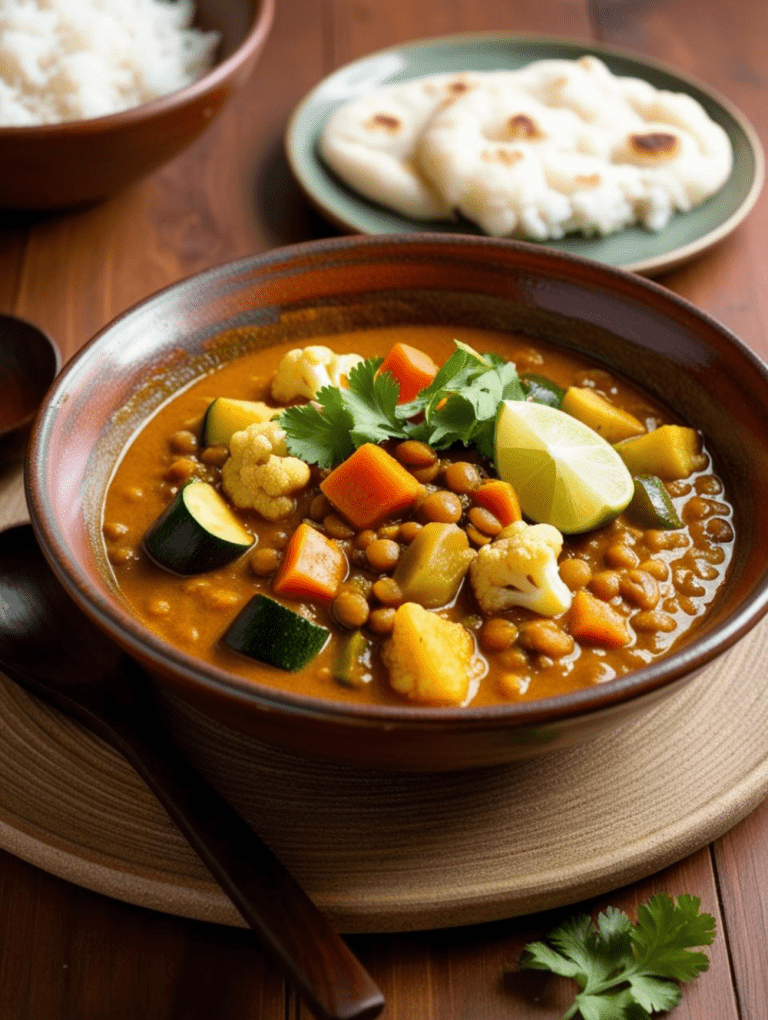
Lentil & Vegetable Curry
Hearty Lentil and Vegetable Curry: A Flavorful and Nutritious Comfort Meal
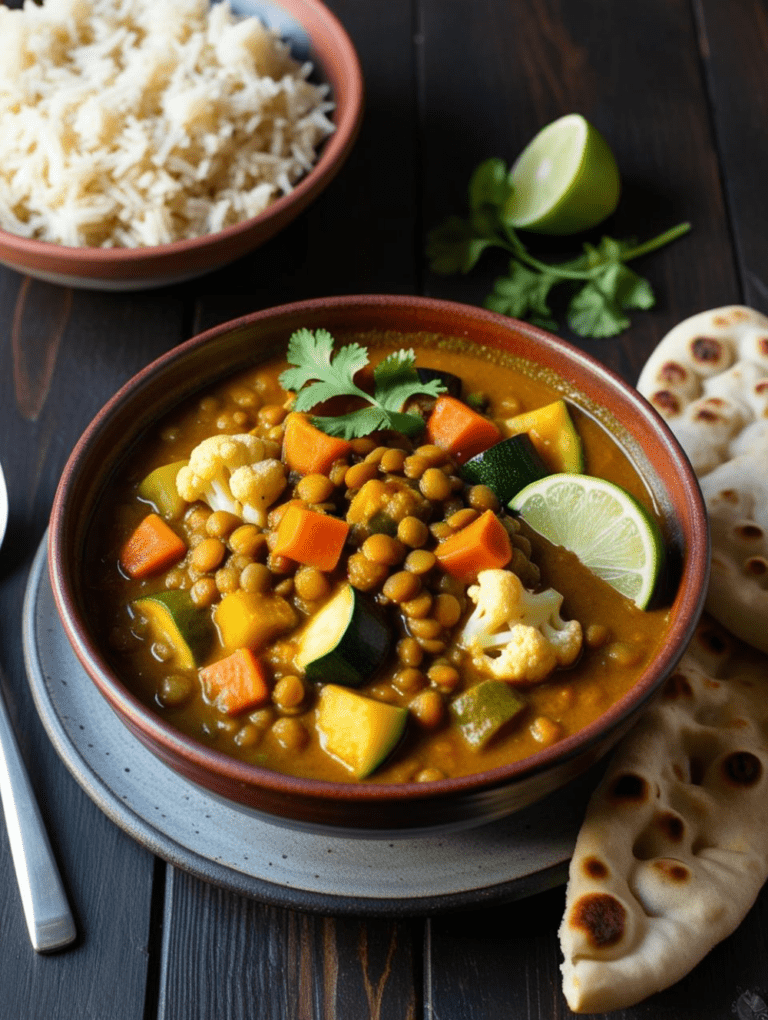
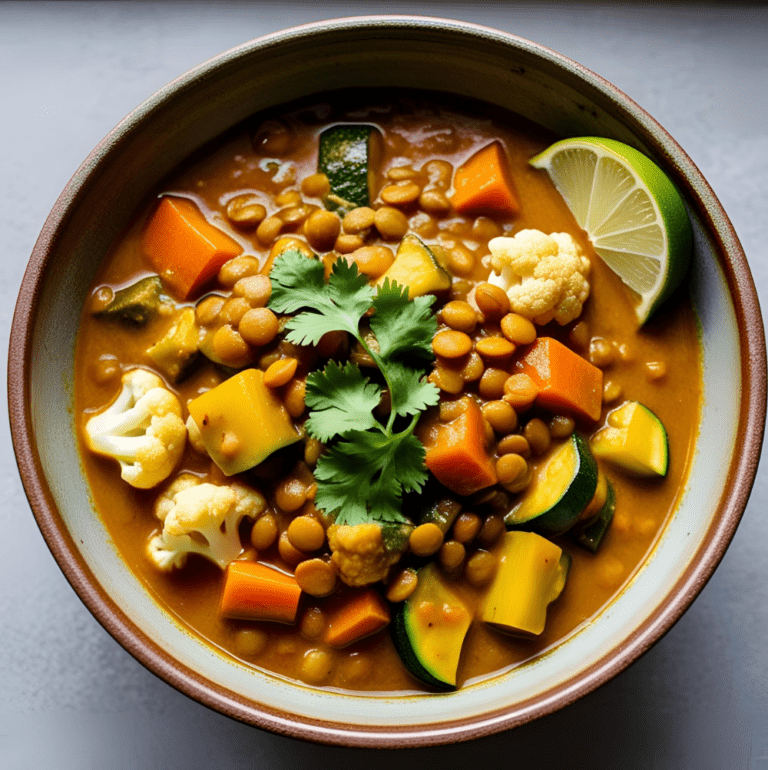
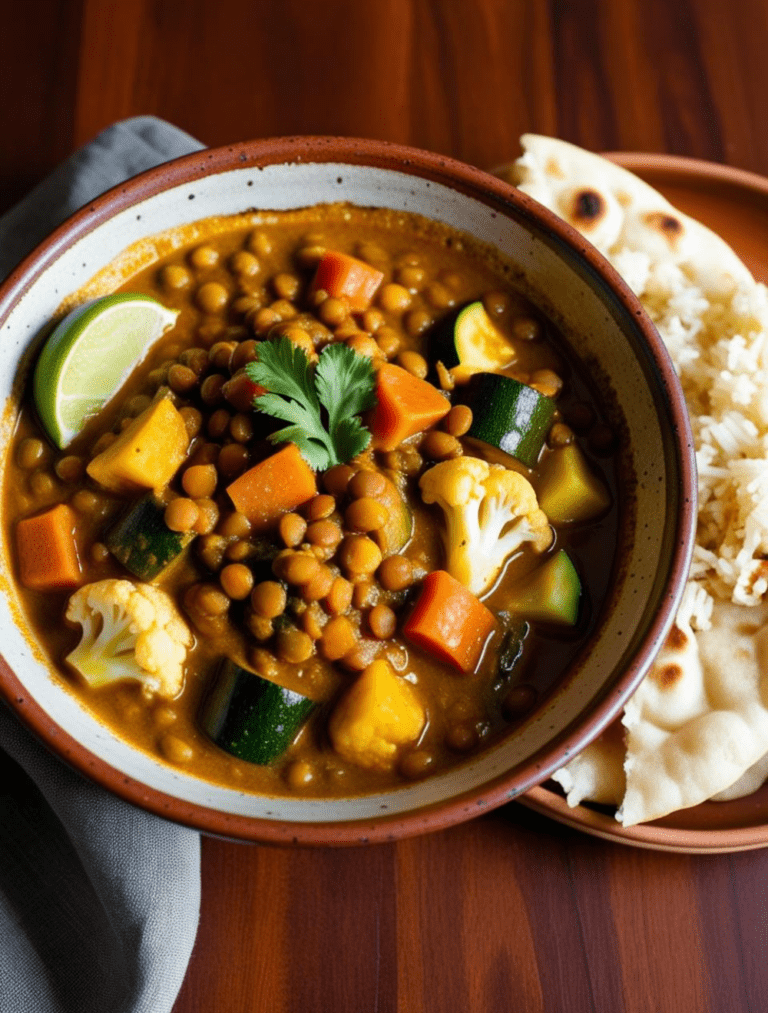
There’s something truly special about a warm, comforting bowl of Lentil and Vegetable Curry—a dish that nourishes both the body and soul. Packed with protein-rich lentils, vibrant seasonal vegetables, and aromatic spices, this one-pot wonder is more than just a meal; it’s a celebration of flavors, textures, and global culinary traditions. Whether you’re looking for a cozy winter stew, a light and refreshing spring curry, or a meal-prep-friendly dish that tastes even better the next day, this recipe has you covered. With its creamy, rich texture and bold, well-balanced spices, this curry is both deeply satisfying and incredibly versatile. Plus, it’s naturally vegan, gluten-free, and budget-friendly, making it the perfect choice for anyone looking to enjoy wholesome, homemade food without breaking the bank.
The best part? You can customize it to suit your preferences and the seasons! Want a lighter, citrus-infused summer curry? Add fresh basil and a touch of coconut milk. Looking for a hearty, warming meal for cold nights? Use sweet potatoes, smoked paprika, and a slow-simmered base for maximum depth. No matter how you make it, this curry is designed to bring comfort, warmth, and nourishment to your table. It’s easy to prepare, stores beautifully for meal prep, and can be adapted to any dietary needs. So, whether you’re a seasoned cook or trying lentils for the first time, get ready to fall in love with this rich, flavorful, and incredibly satisfying Lentil and Vegetable Curry! 🍛✨
Nutritional Breakdown of Lentil and Vegetable Curry
Eating a balanced and nutrient-rich meal is essential, and this Lentil and Vegetable Curry is packed with fiber, plant-based protein, vitamins, and essential minerals. Here’s a detailed nutritional breakdown per serving (assuming the recipe makes 4 servings):
🔍 Estimated Nutritional Facts (Per Serving)
- Calories: ~350-400 kcal
- Protein: ~14-18g
- Carbohydrates: ~45-50g
- Dietary Fiber: ~12-15g
- Total Fat: ~10-12g
- Saturated Fat: ~6g (from coconut milk)
- Cholesterol: 0mg (100% plant-based)
- Sodium: ~400-600mg (varies based on salt and broth used)
- Sugars: ~7-10g (from tomatoes and vegetables)
🌿 Key Nutritional Benefits
1. High in Plant-Based Protein
Lentils are an excellent source of protein, making this dish perfect for vegetarians and vegans looking for a satisfying meal. Each serving provides about 14-18 grams of protein, helping to support muscle health and keep you full longer.
2. Packed with Fiber for Digestion
This curry is rich in dietary fiber, thanks to lentils and vegetables like carrots, bell peppers, and zucchini. Each serving provides 12-15 grams of fiber, promoting healthy digestion and gut health.
3. Rich in Essential Vitamins and Minerals
- Iron (helps prevent anemia and boosts energy levels)
- Magnesium (supports heart health and muscle function)
- Potassium (helps regulate blood pressure and fluid balance)
- Vitamin A & C (boost immunity and promote skin health)
4. Low in Saturated Fat & Cholesterol-Free
Since this recipe is plant-based, it’s naturally cholesterol-free. Using lite coconut milk or substituting it with almond milk or cashew cream can further reduce the saturated fat content.
5. A Great Source of Slow-Digesting Carbohydrates
Lentils provide complex carbohydrates that release energy slowly, preventing blood sugar spikes and keeping you full longer—making this curry a diabetic-friendly meal option when served in moderation.
💡 How to Make This Curry Even Healthier
✅ Reduce Sodium – Use low-sodium broth and limit added salt.
✅ Lower Fat – Swap full-fat coconut milk for lite coconut milk or unsweetened almond milk.
✅ Boost Protein – Add chickpeas, tofu, or tempeh.
✅ Increase Fiber – Serve with quinoa instead of white rice for extra fiber.
This Lentil and Vegetable Curry isn’t just delicious—it’s a nutrient powerhouse! Whether you’re looking for a high-protein vegan meal, a gut-friendly dish, or a heart-healthy recipe, this curry has it all. Enjoy a warm, comforting, and nourishing meal that supports overall well-being!
Lentil Types Explained: Which One is Best for Curry?
Lentils are an essential part of many global cuisines, especially in Indian, Middle Eastern, and Mediterranean dishes. But not all lentils are the same—each type has its own texture, cooking time, and best uses. Choosing the right lentil for your Lentil and Vegetable Curry can make all the difference in flavor and consistency. Here’s a breakdown of the most common lentil varieties and which one is best for your curry.
🥄 1. Brown Lentils (The All-Purpose Choice)
- Texture: Soft but holds shape
- Cooking Time: 20-25 minutes
- Best For: Thick curries, stews, and soups
- Flavor: Mild, slightly earthy
Brown lentils are one of the best choices for lentil curry because they hold their shape while still turning tender. They blend well with vegetables and spices, making them a great all-purpose option.
✅ Why Use in Curry?
- They absorb flavors well while maintaining structure.
- They’re widely available and affordable.
🟢 2. Green Lentils (Hearty & Nutty)
- Texture: Firm and slightly chewy
- Cooking Time: 25-30 minutes
- Best For: Chunky curries, salads, side dishes
- Flavor: Earthy and peppery
Green lentils are a bit firmer than brown lentils, so they’re ideal if you prefer a more textured curry rather than a smooth, creamy one. They add a slightly nutty flavor, which pairs well with warming spices like cumin and turmeric.
✅ Why Use in Curry?
- They don’t get mushy, giving the dish a heartier texture.
- Their peppery taste adds depth to spice blends.
🔴 3. Red & Yellow Lentils (Creamy & Quick-Cooking)
- Texture: Soft and creamy
- Cooking Time: 10-15 minutes
- Best For: Smooth curries, dal, soups
- Flavor: Mild and slightly sweet
Red and yellow lentils break down completely when cooked, creating a thick and creamy curry. They are perfect for Indian-style dal, where you want a stew-like consistency rather than individual lentils.
✅ Why Use in Curry?
- They cook quickly, making them great for fast meals.
- They create a naturally thick and creamy curry.
⚠️ Keep in Mind:
If you prefer chunky curries, red lentils might not be the best choice since they break down easily. However, they can be mixed with brown or green lentils for a balanced texture.
⚫ 4. Black Lentils (Urad Dal or Beluga Lentils)
- Texture: Firm, creamy when slow-cooked
- Cooking Time: 30-40 minutes
- Best For: Slow-cooked curries, dal makhani
- Flavor: Rich, earthy
Black lentils, such as Urad Dal or Beluga lentils, are more commonly used in Indian slow-cooked dishes like Dal Makhani. They develop a creamy consistency when simmered for longer periods.
✅ Why Use in Curry?
- They add richness and depth to slow-cooked dishes.
- High in protein and iron, making them extra nutritious.
⚠️ Best Used For:
- Hearty, slow-cooked Indian curries rather than quick weekday meals.
🟠 5. Puy Lentils (French Lentils – Firm & Fancy)
- Texture: Very firm, holds shape
- Cooking Time: 30-35 minutes
- Best For: Salads, side dishes
- Flavor: Deep, earthy
Puy lentils are not the best choice for curry because they stay too firm and chewy. They’re better suited for salads or grain bowls.
⚠️ Why Not Use in Curry?
- They don’t soften easily, making them less ideal for creamy or thick curries.
⭐ Which Lentil is Best for Curry?
The best lentil depends on the type of curry you want to make:
✅ For a thick and creamy curry: Red or yellow lentils
✅ For a hearty and textured curry: Brown or green lentils
✅ For a slow-cooked, rich curry: Black lentils (Urad Dal)
🔥 Pro Tip:
For the best flavor and texture, mix two types of lentils—use brown or green lentils for structure and red lentils for a creamy base!
Understanding lentils can take your curry game to the next level! Whether you like your curry smooth and creamy or chunky and hearty, picking the right lentil makes all the difference.
💡 Which lentil is your favorite for curry? Comment below! Let’s keep the curry conversation going! 🍛✨
Try some of our other recipes!
The Secret to a Rich and Flavorful Curry Base
A truly delicious and aromatic curry starts with the perfect base. This is where the depth of flavor develops, allowing all the ingredients to meld into a rich, savory, and well-balanced dish. If you’ve ever wondered why restaurant curries taste so indulgent, it’s because of layering flavors and proper cooking techniques. Here’s how you can master the secret to a perfect curry base at home!
1. Start with Slow-Cooked Aromatics 🧅🧄
The foundation of any great curry begins with onions, garlic, and ginger. These ingredients are essential for creating a deep, savory flavor that enhances the entire dish.
🔹 The Right Technique:
- Chop the onions finely to help them break down smoothly into the curry.
- Cook onions slowly over medium-low heat for at least 8-10 minutes. This allows them to soften and caramelize, developing a natural sweetness that balances the spices.
- Add garlic and ginger only after the onions are golden brown—this prevents burning and enhances their aromatic properties.
🔥 Pro Tip: If you want an ultra-rich and authentic curry, try using a combination of red and white onions or even blending sautéed onions into a paste for extra silkiness!
2. Toast the Spices for Depth 🌶️
One of the biggest mistakes when making curry is adding spices directly into the liquid without toasting them first.
🔹 How to Get the Best Flavor From Spices:
- Add whole spices (like cumin seeds, coriander seeds, mustard seeds, or cinnamon sticks) at the start, right after the oil is heated. Let them sizzle for 30 seconds to release their essential oils.
- Next, add ground spices (like curry powder, turmeric, paprika, or garam masala) after the onions, garlic, and ginger have softened. Toast for 30 seconds to 1 minute to enhance their flavors.
- Avoid rushing—letting the spices cook in oil for a short time intensifies their aroma and eliminates any raw taste.
🔥 Pro Tip: For an even deeper flavor, dry-toast whole spices first, then grind them into a powder before adding them to the curry. This technique is a game-changer!
3. Build Layers with Tomatoes or Yogurt 🍅🥛
After the aromatics and spices, the next step is to introduce a base ingredient that adds body and acidity to balance the richness.
🔹 Best Options for a Flavorful Base:
- Tomatoes (fresh or canned) – Adds acidity, depth, and slight sweetness.
- Tomato paste – More concentrated and enhances umami.
- Yogurt – Used in Indian curries for a tangy, creamy base.
- Coconut milk – Perfect for Thai-style curries or creamy, mild curries.
🌟 Secret Tip: If using tomatoes, let them cook for at least 10 minutes until they break down completely and the oil starts to separate. This intensifies the umami and gives the curry a restaurant-style texture.
4. Use the Right Oil for Maximum Flavor 🥥🫒
The choice of oil plays a key role in how well your spices bloom and how rich your curry becomes.
🔹 Best Oils for Curry:
- Coconut oil – Great for creamy, tropical-flavored curries.
- Ghee (clarified butter) – Adds an authentic Indian richness and nutty taste.
- Mustard oil – Gives a strong, pungent flavor, common in Bengali cuisine.
- Olive oil or vegetable oil – Good neutral options for everyday curries.
🔥 Pro Tip: Don’t skimp on oil! A little extra fat helps carry the spices and enhances the overall richness of the curry.
5. Simmer Slowly for Depth & Thickness 🍲
Once your base is built, it’s time to let the magic happen—simmering.
🔹 Why Slow Simmering is Important:
- Helps flavors meld together beautifully.
- Allows the curry to thicken naturally without needing cornstarch.
- Enhances the creaminess of lentils, tomatoes, or coconut milk.
⏳ Minimum Simmering Time:
- 15-20 minutes for a quick curry.
- 30+ minutes for a deep, rich flavor.
- Low and slow cooking (1 hour) for the ultimate thick, restaurant-quality curry!
🔥 Pro Tip: Stir occasionally and watch for oil separation—when you see a thin layer of oil floating on top, you know your curry has reached peak flavor!
6. Finish with a Flavor Boost 🌿
Even the most well-cooked curry can benefit from a final flavor enhancer.
🔹 Best Finishing Touches:
✔️ Fresh cilantro – Adds brightness and freshness.
✔️ Lemon or lime juice – Enhances the spice and balances richness.
✔️ Garam masala – A final sprinkle at the end deepens the aroma.
✔️ A drizzle of coconut cream – For extra creaminess in mild curries.
🔥 Pro Tip: Add fresh herbs and citrus juice AFTER cooking to keep their vibrant flavors intact.
Mastering the Perfect Curry Base
A truly rich and flavorful curry doesn’t happen by accident—it’s all about layering ingredients properly and taking your time to develop depth. By following these steps, you’ll be able to create a restaurant-style curry that’s bursting with bold, complex flavors!
How to Thicken or Thin Your Curry: Perfecting the Texture
The texture of a curry can make or break the dish. Too thick, and it can feel heavy; too thin, and it may lack richness and body. The good news? You can easily adjust the consistency to your liking with a few simple techniques! Whether you want a thick, velvety curry or a lighter, soup-like version, here’s how to thicken or thin your curry without compromising flavor.
🥄 How to Thicken Curry (For a Creamier, Richer Texture)
If your curry is too runny, don’t worry—there are several natural ways to thicken it without sacrificing taste.
1. Simmer for Longer (Best for Natural Thickening) 🍲
The easiest way to thicken curry is to let it simmer uncovered for an extra 10-15 minutes over low to medium heat.
- This helps excess water evaporate, concentrating the flavors.
- Stir occasionally to prevent burning and allow the curry to develop a richer taste.
- Look for oil separation—this is a sign your curry has thickened beautifully.
🔥 Pro Tip: If your curry has dairy (like yogurt or cream), simmer on low heat to prevent curdling.
2. Mash or Blend Some of the Ingredients 🥕🍅
If you’re making a lentil or vegetable-based curry, you can thicken it by blending a portion of the cooked curry.
- Use an immersion blender to blend about ¼ of the curry and mix it back in.
- If you prefer a chunky texture, simply mash some of the lentils, chickpeas, or vegetables with a fork or potato masher.
- This creates a creamy consistency naturally without needing any extra ingredients.
🔥 Best for: Lentil curries, chickpea curries, and tomato-based curries.
3. Add Coconut Milk or Dairy for Creaminess 🥥🥛
Adding full-fat coconut milk, heavy cream, or Greek yogurt can instantly thicken a curry while adding a rich, creamy texture.
- Coconut milk is perfect for vegan or Thai-style curries.
- Heavy cream or yogurt adds thickness to Indian curries like tikka masala or butter chicken.
- Stir in at the end of cooking to prevent curdling.
🔥 Pro Tip: For extra richness, use coconut cream instead of coconut milk!
4. Use a Thickening Agent (Flour, Cornstarch, or Arrowroot) 🌾
If you need a quick fix, a small amount of flour, cornstarch, or arrowroot powder can help thicken your curry instantly.
- Cornstarch Slurry: Mix 1 tablespoon cornstarch with 2 tablespoons water, then stir it into the simmering curry. Let it cook for 2-3 minutes until thickened.
- Arrowroot Powder (Gluten-Free Alternative): Works the same way as cornstarch but is lighter in texture.
- Flour or Chickpea Flour: Mix a small amount with water and add to the curry for a nutty flavor boost.
🔥 Pro Tip: Avoid adding these powders directly to the pot, as they can create lumps. Always mix with cold water first!
5. Add Ground Nuts or Nut Butter 🌰🥜
A secret chef’s trick for thickening curry while adding depth and richness is using ground nuts or nut butter.
- Almond flour or cashew paste blends smoothly into the curry, creating a silky texture.
- Peanut butter or tahini adds a unique nutty taste (great for Thai or African-inspired curries).
- Stir in 1-2 tablespoons and let it cook for a few minutes to thicken naturally.
🔥 Best for: Indian, Thai, or African-style curries with a creamy consistency.
💧 How to Thin Curry (For a Lighter, Soupier Consistency)
If your curry is too thick and you’d like a lighter consistency, here’s how to thin it out without making it watery.
1. Add More Liquid (Water, Broth, or Coconut Milk) 🍶
- The simplest way to thin a curry is by adding warm water, vegetable broth, or coconut milk in small amounts.
- Add ¼ cup at a time, stirring well until you reach your desired consistency.
🔥 Best for: Curries that have thickened too much during simmering.
2. Use Tomato Puree or Diced Tomatoes 🍅
- If your curry needs both thinning and extra flavor, add crushed or diced tomatoes.
- Tomatoes add natural acidity and juiciness, making them a great way to lighten the curry.
🔥 Best for: Tomato-based curries like chana masala or lentil curry.
3. Increase the Heat Slightly to Loosen the Curry 🔥
- If your curry has thickened overnight in the fridge, reheating it over medium heat with the lid on can help it loosen up.
- Stir in a splash of water or broth as needed.
🔥 Best for: Leftover curries that have thickened too much after refrigeration.
🔑 Perfecting Your Curry’s Consistency
✅ For a thicker curry: Simmer longer, mash/blend some ingredients, add coconut milk or dairy, or use a thickening agent.
✅ For a thinner curry: Add broth, coconut milk, or tomato puree and reheat gently.
✅ For the perfect balance: Simmer and taste-test frequently—adjusting as needed until you reach the ideal texture.
🌱 How to Customize Lentil and Vegetable Curry for Vegan, Vegetarian, and Gluten-Free Diets
One of the best things about Lentil and Vegetable Curry is how easy it is to customize based on dietary preferences. Whether you’re vegan, vegetarian, or gluten-free, this dish is naturally adaptable and packed with nutrition. Here’s how to tweak the recipe to suit your needs while keeping it flavorful and satisfying!
🌱 Vegan Lentil and Vegetable Curry (100% Plant-Based)
This recipe is already vegan-friendly, but here are a few extra ways to enhance the flavor while keeping it fully plant-based:
1. Swap Dairy for Coconut-Based Alternatives
- If you want a creamy texture, full-fat coconut milk is the best replacement for yogurt or cream.
- For a richer curry, add cashew cream (blend soaked cashews with water for a silky finish).
2. Boost the Protein Without Animal Products
- Add chickpeas, tofu, or tempeh for extra plant-based protein.
- Sprinkle in nutritional yeast for a cheesy, umami depth of flavor.
3. Intensify the Umami Flavor Without Ghee
- Traditional Indian curries sometimes use ghee (clarified butter), but you can use coconut oil, avocado oil, or vegan butter instead.
- To create deeper flavors, try adding a teaspoon of miso paste or tamari for a savory kick.
🔥 Vegan Pro Tip: Roast the lentils for 5 minutes in a dry pan before cooking. This enhances their nutty flavor and makes the curry taste even more robust!
🥕 Vegetarian Lentil and Vegetable Curry
A vegetarian version is just as easy—this recipe is already meat-free, but if you’re not strictly vegan, you can enhance it with dairy-based ingredients for extra richness.
1. Add Dairy for a Creamier, Traditional Taste
- Instead of coconut milk, use Greek yogurt or heavy cream for a thick, creamy consistency.
- A tablespoon of butter or ghee adds extra richness and a traditional Indian flavor.
2. Add Paneer for Extra Protein & Texture
- Stir in cubed paneer (Indian cottage cheese) in the last 5 minutes of cooking.
- Paneer stays firm and soaks up all the delicious curry flavors.
🔥 Vegetarian Pro Tip: Sprinkle grated hard cheese (like aged cheddar or parmesan) on top for an added depth of flavor—unconventional, but delicious!
🌾 Gluten-Free Lentil and Vegetable Curry
This recipe is naturally gluten-free, but it’s important to check your ingredients carefully to avoid any hidden gluten.
1. Be Mindful of Store-Bought Spice Blends
- Many pre-made curry powders and garam masala blends contain fillers or additives that may include gluten.
- Use certified gluten-free spice blends or make your own at home.
2. Choose the Right Side Dishes
- Skip naan bread (which contains wheat flour) and serve with:
✅ Basmati rice
✅ Quinoa (for extra protein)
✅ Cauliflower rice (low-carb, gluten-free alternative)
3. Thicken the Curry Without Flour-Based Agents
- Avoid wheat flour as a thickening agent and use:
✅ Blended lentils or mashed potatoes for a natural thickener.
✅ Arrowroot powder or cornstarch (gluten-free thickening agents).
🔥 Gluten-Free Pro Tip: If using store-bought vegetable broth, make sure it’s certified gluten-free, as some brands contain additives with gluten traces.
💡 Mix & Match for the Perfect Variation!
✅ Vegan & Gluten-Free: Use coconut milk, avoid dairy-based yogurt, and check spice blends.
✅ Vegetarian & Gluten-Free: Use Greek yogurt or paneer, but avoid naan.
✅ Vegan & High-Protein: Add tofu, tempeh, or chickpeas for an extra protein boost.
This Lentil and Vegetable Curry is a versatile, wholesome, and customizable dish that fits into any dietary lifestyle. Whether you’re vegan, vegetarian, or gluten-free, you can make small tweaks without losing flavor.

🥘 Why This Lentil Curry is Great for Meal Prep and Freezing
If you’re looking for a meal prep-friendly recipe, this Lentil and Vegetable Curry is a game-changer! It’s hearty, flavorful, and stores beautifully, making it a perfect choice for busy weeknights, work lunches, or freezer meals. Whether you want to cook in bulk, save time, or always have a delicious homemade meal on hand, here’s why this curry is a meal prep superstar and how to store it for maximum freshness.
⏳ 1. It Tastes Even Better the Next Day!
One of the best things about lentil curry is that the flavors continue to develop as it sits. The spices blend more deeply, making it even more delicious the next day. This means it’s an ideal make-ahead meal—just cook, refrigerate, and enjoy even tastier leftovers!
🔥 Meal Prep Tip: If you have time, make the curry one day in advance and let it rest overnight in the fridge. Reheat it for an even richer, more complex flavor!
🍱 2. It Stores Well in the Fridge for Up to 4 Days
This lentil curry stays fresh and flavorful in the fridge for up to 4 days when stored properly.
How to Store in the Fridge:
- Let the curry cool completely before transferring it to an airtight container.
- Store in the refrigerator for 3-4 days.
- Reheat on the stovetop over medium heat or in the microwave with a splash of water or broth to loosen the consistency.
🔥 Pro Tip: Store rice separately to prevent it from absorbing too much moisture and getting mushy.
❄️ 3. Freezes Perfectly for Up to 3 Months
This curry is freezer-friendly, making it great for batch cooking and having ready-made meals at your fingertips.
How to Freeze Curry:
- Let the curry cool to room temperature.
- Divide into individual portions or family-sized servings.
- Store in freezer-safe containers or zip-top freezer bags.
- Label with the date and freeze for up to 3 months.
How to Reheat from Frozen:
- Overnight Thawing: Transfer to the fridge the night before and reheat on the stove.
- Quick Thaw: Heat frozen curry directly in a saucepan over low heat, adding a splash of water or broth as needed.
- Microwave Method: Place in a microwave-safe container, cover, and heat in 30-second intervals, stirring in between.
🔥 Best Freezing Tip: Avoid freezing curry with coconut milk or yogurt—these ingredients can separate upon thawing. Instead, add them fresh after reheating.
📦 4. It’s Perfect for Grab-and-Go Work Lunches
This curry is a nutritious and filling lunch option that can be quickly reheated at work.
Meal Prep Ideas:
✅ Store curry in one container and rice or naan separately to keep textures perfect.
✅ Pre-portion into glass containers for easy reheating.
✅ Add fresh toppings (like cilantro or a squeeze of lemon) right before eating for a burst of freshness.
🔥 Pro Tip: Take your meal prep to the next level by portioning the curry into mason jars for a mess-free, portable meal!
This Lentil and Vegetable Curry is the ultimate meal prep and freezer-friendly recipe—it’s easy to make, stores beautifully, and tastes even better over time! Whether you’re planning work lunches, busy weeknight dinners, or emergency freezer meals, this curry has you covered.
💬 Have you tried meal-prepping this curry? Let us know in the comments how you store and reheat your leftovers! 🍛❄️
📌 Cooking Tips & Troubleshooting: Perfecting Your Lentil and Vegetable Curry
Even the most seasoned home cooks run into curry mishaps from time to time. Whether your curry turns out too thin, too spicy, or lacking depth, don’t worry—there’s always a fix! Below, you’ll find pro tips and easy troubleshooting solutions to help you make the best Lentil and Vegetable Curry every time.
🔥 1. How to Prevent a Watery or Thin Curry
A curry that’s too runny can lack richness and flavor. Here’s how to thicken it up naturally:
✔️ Simmer uncovered for an extra 10-15 minutes to reduce excess liquid.
✔️ Mash or blend some of the lentils to create a naturally thick consistency.
✔️ Stir in coconut milk, yogurt, or cashew cream for added creaminess.
✔️ Add a thickening agent like cornstarch, arrowroot powder, or blended chickpeas.
🔥 Pro Tip: Avoid adding too much broth at once—start with less liquid and gradually add more if needed.
🌶️ 2. How to Fix a Curry That’s Too Spicy
Oops! Added too much chili powder or cayenne? No worries—there are easy ways to tone down the heat:
✔️ Add coconut milk or yogurt to balance the spice with creaminess.
✔️ Stir in a teaspoon of sugar or a splash of lemon juice to neutralize the heat.
✔️ Mix in more cooked lentils or vegetables to dilute the spiciness.
✔️ Serve with extra rice, naan, or a cooling cucumber raita to mellow out the heat.
🔥 Pro Tip: Always add spice gradually—you can add more heat later, but you can’t take it out once it’s in!
🧄 3. How to Prevent Garlic or Spices from Burning
Burnt garlic or spices can ruin the flavor of your curry, making it taste bitter. Here’s how to avoid this mistake:
✔️ Sauté onions first until soft before adding garlic and ginger—this prevents scorching.
✔️ Add spices after onions are cooked, stirring for 30 seconds before adding liquid.
✔️ If the pan gets too hot, add a splash of water to cool it down before adding spices.
🔥 Pro Tip: If your garlic or spices burn, it’s best to start over—burnt spices can give your curry a bitter taste that’s hard to fix.
🍛 4. How to Boost a Curry That’s Too Bland
If your curry lacks flavor, it might need a little extra love. Here’s how to intensify the taste:
✔️ Add a pinch of salt—sometimes, blandness is just a lack of proper seasoning.
✔️ Stir in a teaspoon of garam masala or curry powder at the end for an extra flavor punch.
✔️ Use roasted or sun-dried tomatoes instead of fresh tomatoes for deeper umami.
✔️ Finish with a squeeze of lemon juice or a splash of vinegar to enhance the spices.
✔️ Let the curry rest for 10-15 minutes before serving—flavors meld together over time.
🔥 Pro Tip: A little soy sauce or miso paste can also add umami depth to a bland curry!
🟠 5. How to Keep Lentils from Getting Mushy or Undercooked
Cooking lentils just right is key to a great curry—here’s how to avoid common mistakes:
✔️ Undercooked lentils? Simmer longer and add an extra ½ cup of broth if needed.
✔️ Mushy lentils? Reduce the cooking time and add lentils toward the middle of cooking instead of the beginning.
✔️ Using red lentils? These cook quickly and will naturally break down—use green or brown lentils if you prefer a firmer texture.
🔥 Pro Tip: Soak lentils for 15-20 minutes before cooking to help them soften evenly.
💧 6. How to Prevent a Dry or Overly Thick Curry
If your curry is too thick and needs a smoother consistency, try these quick fixes:
✔️ Stir in a little vegetable broth, coconut milk, or water—add ¼ cup at a time until desired consistency is reached.
✔️ Reheat gently and stir well to loosen the texture—curries thicken as they sit.
✔️ Avoid adding too many lentils at once, as they absorb a lot of liquid.
🔥 Pro Tip: If reheating a stored curry, always add a splash of liquid before reheating to restore the original consistency.
🍚 7. How to Keep Curry from Sticking to the Pan
If your curry keeps sticking or burning, your heat might be too high. Here’s what to do:
✔️ Use a heavy-bottomed pan to distribute heat evenly.
✔️ Stir frequently, especially if using thick ingredients like coconut milk or tomato paste.
✔️ Add a bit more oil or broth to loosen the mixture.
✔️ Cook on medium heat—high heat can burn spices before the curry is fully developed.
🔥 Pro Tip: If food sticks, deglaze the pan with a splash of broth or water to lift the flavors.
🔄 8. How to Save Over-Salted Curry
If you accidentally added too much salt, don’t panic! Here’s how to balance it out:
✔️ Add a peeled potato to the pot—it absorbs excess salt. Remove after 15 minutes.
✔️ Stir in more cooked lentils or vegetables to dilute the saltiness.
✔️ Add a splash of coconut milk or yogurt to mellow out the salt.
✔️ Increase acidity by adding a squeeze of lemon juice or a bit of sugar.
🔥 Pro Tip: Always add salt gradually—you can add more later, but you can’t remove it!
✨ Mastering the Perfect Curry
Cooking Lentil and Vegetable Curry is an art, and every batch can teach you something new. With these pro tips and troubleshooting fixes, you’ll be able to create a flavor-packed, perfectly textured curry every time!
💬 What’s your biggest curry challenge? Drop your questions in the comments—we’d love to help! 🍛🔥

Lentil & Vegetable Curry
Equipment
- Large Pot or Dutch Oven – For simmering the curry and developing rich flavors.
- Cutting Board & Sharp Knife – For chopping vegetables, onions, garlic, and ginger.
- Wooden Spoon or Silicone Spatula – To stir the curry without scratching the pot.
- Measuring Cups & Spoons – For accurately measuring spices, broth, and coconut milk.
- Fine-Mesh Strainer – To rinse lentils thoroughly before cooking.
- Blender or Immersion Blender (Optional) – If you prefer a smoother curry texture.
- Small Bowl – For mixing spice blends before adding them to the curry.
- Ladle – For serving the curry easily.
- Serving Bowls & Plates – To enjoy your delicious meal with rice or naan.
Ingredients
Lentils and Vegetables
- 1 cup dried lentils green or brown, rinsed
- 1 small onion finely chopped
- 3 cloves garlic minced
- 1- inch piece of ginger grated
- 1 cup tomatoes diced (or 1 can crushed tomatoes)
- 2 cups mixed vegetables carrots, bell peppers, zucchini, cauliflower, or sweet potatoes
- 4 cups vegetable broth
- 1 can 13.5 oz coconut milk (full-fat for creaminess or lite for a lighter version)
Spices and Seasonings
- 1 tablespoon curry powder
- 1 teaspoon cumin
- 1 teaspoon coriander
- 1 teaspoon turmeric
- ½ teaspoon paprika or cayenne for heat
- 1 teaspoon garam masala optional, for extra depth
- Salt and black pepper to taste
- 1 tablespoon olive oil or coconut oil
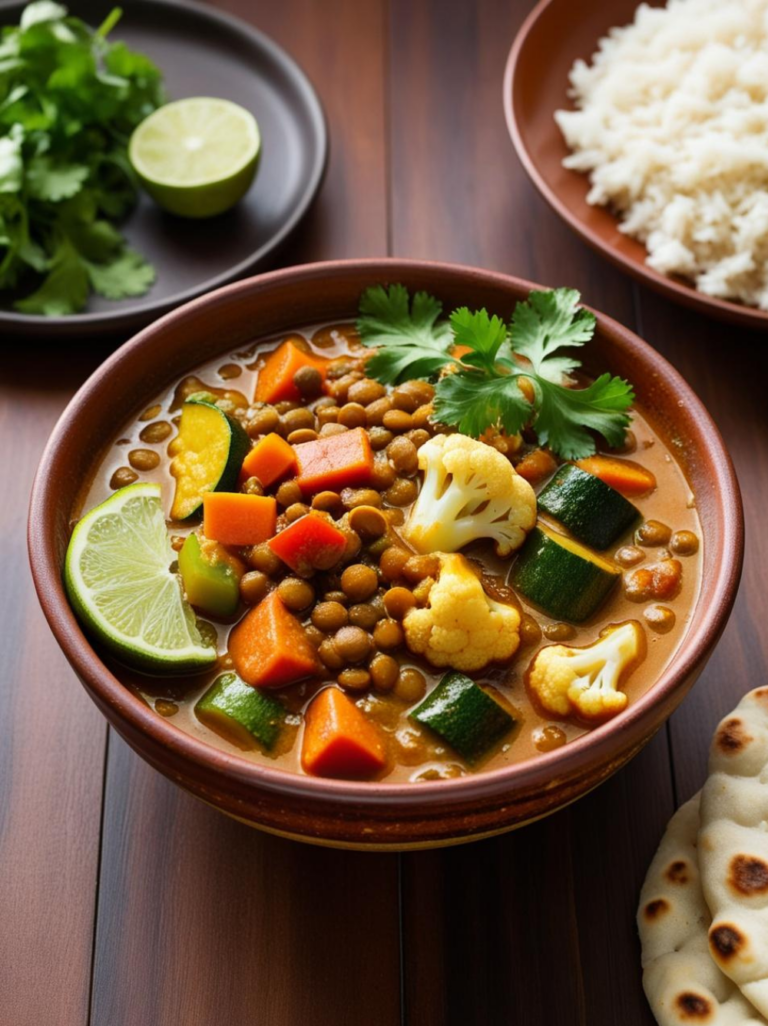
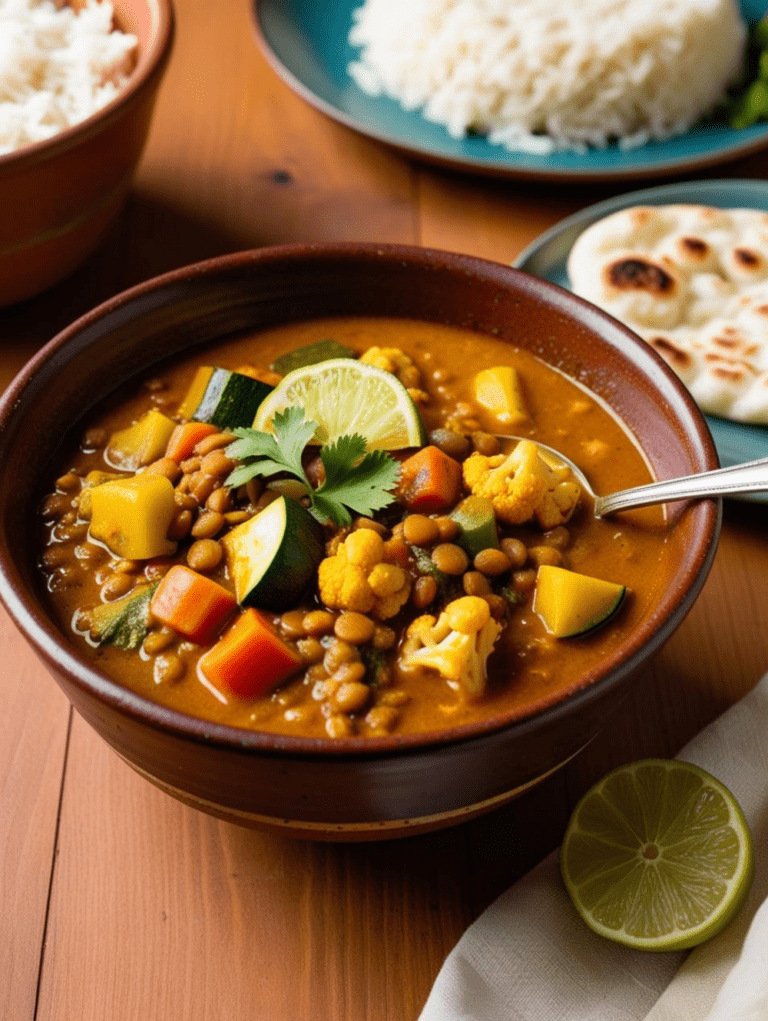
Garnishes and Accompaniments
- Fresh cilantro chopped (for garnish)
- Juice of ½ a lemon or lime for brightness
- Cooked basmati rice or naan bread for serving
Instructions
Step 1: Sauté the Aromatics
- Heat oil in a large pot over medium heat.
- Add the onion and sauté until soft and translucent, about 3-4 minutes.
- Stir in the garlic and ginger, cooking for another minute until fragrant.
Step 2: Add the Spices
- Sprinkle in the curry powder, cumin, coriander, turmeric, paprika, and garam masala.
- Stir well to coat the onions and toast the spices for about 30 seconds, releasing their flavors.
Step 3: Build the Base
- Add the diced tomatoes and cook for 2-3 minutes, stirring occasionally, until they break down.
- Pour in the vegetable broth and lentils, then bring to a gentle simmer.
- Cover and cook for 15-20 minutes, stirring occasionally, until the lentils are tender.
Step 4: Add the Vegetables and Coconut Milk
- Stir in the chopped vegetables and let them simmer for another 10-15 minutes, until soft.
- Pour in the coconut milk, stirring well to create a rich and creamy texture.
- Season with salt and black pepper to taste.
Step 5: Final Touches
- Finish with a squeeze of fresh lemon or lime juice for brightness.
- Garnish with chopped cilantro before serving.
- Serve hot with steamed rice or naan bread for the ultimate comfort meal.
Notes
Make Ahead and Storage
Make Ahead
- This curry is an excellent meal prep option, as the flavors develop even more after a day.
- Cook the curry in advance and store it in the refrigerator for up to 4 days.
Storage
- Refrigerator: Store leftovers in an airtight container for up to 4 days.
- Freezer: Freeze in portions for up to 3 months. Thaw overnight in the fridge before reheating.
- Reheating: Warm on the stovetop over medium heat, adding a splash of broth or water if needed.
🌍 Regional Variations of Lentil Curry: How the World Cooks Lentils
Indian lentil curries (dal) are rich, aromatic, and deeply comforting. Dal is a staple in Indian households, often served with rice or roti. Different regions of India prepare dal in varied ways, depending on the type of lentils and spices used.
Popular Indian Lentil Curries
✔️ Dal Tadka (Northern India) – Made with yellow or red lentils, flavored with cumin, garlic, onions, and tomatoes, then finished with a tempering (tadka) of fried spices in ghee.
✔️ Dal Makhani (Punjab) – A rich, creamy lentil dish made with black lentils (urad dal) and kidney beans, slow-cooked with butter and cream.
✔️ Sambar (Southern India) – A tangy and spicy lentil stew made with toor dal (split pigeon peas), tamarind, and vegetables like drumsticks and carrots.
✔️ Bengali Cholar Dal (Eastern India) – A festive lentil dish made with chana dal (split chickpeas), spiced with bay leaves, cinnamon, and coconut.
🔥 Indian Dal Pro Tip: Many Indian lentil curries improve overnight, as the flavors deepen after resting.
🇳🇵 Nepal: Dal Bhat – A National Staple
In Nepal, lentil curry is known as Dal Bhat, which translates to “lentils and rice.” This dish is eaten daily in most Nepali households and is packed with hearty, warming spices.
What Makes Nepali Dal Unique?
✔️ Uses smoky flavors from toasted cumin and mustard seeds.
✔️ Often served with achar (spicy pickles), greens, and ghee for extra richness.
✔️ Typically made with black lentils, yellow lentils, or split peas.
🔥 Nepali Dal Pro Tip: For an authentic touch, cook dal in a pressure cooker for a rich, thick texture.
🇵🇰 Pakistan: Dal Fry – Spicy and Hearty
Pakistani lentil curry is similar to Indian dal but spicier and richer. The base often includes:
✔️ A mix of lentils – yellow lentils (moong dal), red lentils (masoor dal), or chana dal.
✔️ A spicy tomato base – cooked down with chili powder, garlic, and cumin.
✔️ A buttery finish – a spoonful of ghee is often added at the end for extra richness.
🔥 Pakistani Dal Pro Tip: Serve with paratha (buttery flatbread) instead of rice for a heartier meal.
🇪🇹 Ethiopia: Misir Wat – The Fiery Lentil Stew
Misir Wat is Ethiopia’s answer to lentil curry, made with spicy and smoky berbere seasoning.
What Makes Misir Wat Special?
✔️ Made with red lentils, which break down into a thick, stew-like consistency.
✔️ Uses berbere spice mix – a fiery blend of chili, paprika, cinnamon, and fenugreek.
✔️ Simmered in niter kibbeh (spiced clarified butter) for a rich, aromatic taste.
🔥 Ethiopian Lentil Pro Tip: Serve Misir Wat with injera (a sourdough flatbread) for an authentic experience.
🇹🇭 Thailand: Thai Coconut Lentil Curry
Thai-style lentil curry takes inspiration from Indian and Southeast Asian flavors, creating a fragrant, coconut-based dish.
What Sets Thai Lentil Curry Apart?
✔️ Uses coconut milk for a rich, creamy base.
✔️ Features Thai curry paste (red, green, or yellow) for bold flavors.
✔️ Includes lemongrass, kaffir lime leaves, and Thai basil for freshness.
🔥 Thai Curry Pro Tip: Garnish with crushed peanuts and lime juice for a balance of crunch and acidity.
🇲🇦 Morocco: Harira – A Lentil and Chickpea Soup
In Morocco, lentils are often used in Harira, a comforting soup enjoyed during Ramadan.
What Makes Harira Unique?
✔️ A mix of lentils and chickpeas for texture.
✔️ Spiced with cinnamon, ginger, and turmeric for warmth.
✔️ Includes tomatoes and fresh herbs for a bright, zesty finish.
🔥 Harira Pro Tip: Traditionally, Harira is served with dates and sweet pastries to balance the savory flavors.
🇮🇷 Iran: Adasi – Persian Lentil Stew
Persian cuisine features Adasi, a simple yet flavorful lentil dish that is often eaten for breakfast or as a nourishing meal.
Key Features of Adasi
✔️ Uses green or brown lentils for a thick consistency.
✔️ Flavored with onions, turmeric, and sometimes saffron for a golden color.
✔️ Served with flatbread and pickled vegetables for a complete meal.
🔥 Persian Lentil Pro Tip: For extra depth of flavor, slow-cook the lentils with a cinnamon stick.
🇮🇹 Italy: Zuppa di Lenticchie – Rustic Italian Lentil Soup
Italy’s Zuppa di Lenticchie is a simple yet delicious lentil dish, perfect for cold weather.
What Makes It Different?
✔️ Uses olive oil, garlic, and fresh herbs like rosemary.
✔️ Often includes tomatoes, carrots, and celery for a hearty base.
✔️ Served with crusty bread or pasta for a satisfying meal.
🔥 Italian Lentil Pro Tip: A drizzle of extra virgin olive oil before serving enhances the flavors.
🌍 Which Regional Lentil Curry Will You Try?
Lentil curry is one of the most versatile dishes in the world, with each culture bringing its own unique twist. Whether you prefer spicy, creamy, or tangy flavors, there’s a lentil curry for every palate!
💬 Which version of lentil curry is your favorite? Let us know in the comments below! 🍛✨
🍂🌞 Seasonal Lentil Curry Variations: Adapting Your Curry Year-Round
One of the best things about Lentil and Vegetable Curry is its versatility across all seasons! Whether you’re craving a light and fresh summer curry or a hearty and warming winter dish, you can adjust the ingredients based on what’s in season. Here’s how to tweak your curry to match spring, summer, fall, and winter flavors while keeping it delicious, nutritious, and budget-friendly!
🌸 Spring Lentil Curry: Fresh & Light
As the weather warms up, lighter ingredients and fresh greens make for a refreshing, vibrant curry.
🌱 Best Spring Vegetables for Curry:
✔️ Asparagus – Adds a mild, earthy crunch.
✔️ Peas (snap peas, green peas, or snow peas) – Sweet and fresh.
✔️ Spinach or Swiss chard – Light, leafy greens that blend well into the curry.
✔️ Radishes – Add a peppery bite and a pop of color.
✔️ Leeks – Milder than onions, perfect for a subtle, sweet base.
🍋 Spring Flavor Enhancers:
✔️ Lemon zest or fresh lime juice – Adds a bright citrusy touch.
✔️ Fresh cilantro and mint – Lightens the curry and adds freshness.
✔️ Coconut milk or almond milk – Keeps it light but creamy.
🔥 Spring Curry Pro Tip: Use red lentils for a quicker-cooking, brothier curry that feels light but still satisfying.
☀️ Summer Lentil Curry: Bright & Vibrant
Summer calls for bold flavors, sweet vegetables, and cooling ingredients to keep meals light yet satisfying.
🍆 Best Summer Vegetables for Curry:
✔️ Zucchini or summer squash – Mild and tender, perfect for light curries.
✔️ Eggplant – Soaks up flavors beautifully and adds texture.
✔️ Bell peppers – Bring natural sweetness and vibrant color.
✔️ Cherry tomatoes – Bursting with juicy flavor.
✔️ Green beans – Crisp and fresh, great for adding crunch.
🥭 Summer Flavor Enhancers:
✔️ Fresh basil or Thai basil – Adds a floral, slightly spicy kick.
✔️ Coconut or cashew milk – Keeps the curry rich without feeling heavy.
✔️ Mango or pineapple – A touch of sweetness balances the spices.
✔️ Chili peppers – For those who like a spicier kick.
🔥 Summer Curry Pro Tip: Make a Thai-inspired lentil curry by adding lemongrass, ginger, and fresh lime leaves for a citrusy twist.
🍁 Fall Lentil Curry: Cozy & Hearty
As temperatures drop, it’s time for warm, comforting, and slightly spiced curries using seasonal root vegetables.
🥕 Best Fall Vegetables for Curry:
✔️ Sweet potatoes or butternut squash – Creamy and slightly sweet.
✔️ Pumpkin – Pairs well with warming spices like cinnamon and nutmeg.
✔️ Carrots – Add a touch of natural sweetness.
✔️ Cauliflower – Perfect for a chunky, hearty texture.
✔️ Mushrooms – Add depth and umami richness.
🍂 Fall Flavor Enhancers:
✔️ Cinnamon, nutmeg, or cloves – Adds warmth and depth.
✔️ Garam masala – Enhances earthy flavors.
✔️ Coconut cream – A thicker, richer option for cozy fall meals.
✔️ Toasted pecans or walnuts – Add crunch and nutty undertones.
🔥 Fall Curry Pro Tip: Use brown lentils for a heartier texture, and serve with roasted root vegetables for extra depth.
❄️ Winter Lentil Curry: Rich & Comforting
Winter curries should be thick, warming, and packed with nutrient-dense vegetables to keep you full and energized.
🥔 Best Winter Vegetables for Curry:
✔️ Potatoes – Hearty and filling.
✔️ Parsnips – Sweet and slightly nutty.
✔️ Brussels sprouts – Roast them first for extra flavor.
✔️ Kale or collard greens – Sturdy greens that hold up well in stews.
✔️ Beets – Earthy and vibrant.
🔥 Winter Flavor Enhancers:
✔️ Smoked paprika – Adds warmth and a slightly smoky depth.
✔️ Curry paste or harissa – Extra spice for warmth.
✔️ Ghee or butter – Adds richness and enhances the spice profile.
✔️ Lentil & coconut stew – A thicker, heartier variation with extra coconut milk.
🔥 Winter Curry Pro Tip: Cook your lentils low and slow for maximum depth, and add a sprinkle of toasted seeds or nuts for extra crunch.
✨ Customizing Your Curry Year-Round
✅ Spring & Summer: Light, fresh, citrusy flavors with quick-cooking lentils.
✅ Fall & Winter: Hearty, warming, and rich with earthy vegetables and slow-cooked lentils.
✅ All Seasons: Swap out vegetables based on what’s fresh and in season!
💬 What’s Your Favorite Seasonal Lentil Curry?
Do you love a light summer lentil curry or a cozy winter lentil stew? Let us know in the comments how you customize your curry for each season! 🍛✨
🍛 Bringing Comfort to Your Table: A Curry You’ll Make Again and Again
This Lentil and Vegetable Curry isn’t just a recipe—it’s an experience. From its rich, aromatic base to its deep, satisfying flavors, every spoonful is a reminder that healthy, wholesome food can also be incredibly delicious and comforting. Whether you’re making it as a quick weeknight meal, prepping it ahead for the week, or freezing portions for later, this curry fits effortlessly into any lifestyle. And the best part? It only gets better with time! The lentils soak up the flavors overnight, making leftovers taste even more incredible. No matter your dietary preference—whether you’re vegan, vegetarian, or gluten-free—this dish adapts to your needs while remaining nutrient-dense, budget-friendly, and full of warmth.
Now it’s your turn! Grab your favorite lentils, pick some fresh, seasonal vegetables, and let the magic of homemade curry fill your kitchen with irresistible aromas. Try different variations, experiment with new spices, and don’t be afraid to make it your own. And when you do, we’d love to hear about it! Leave a comment, share your tips, or tag us on social media so we can see your delicious creations. Cooking is meant to be shared, and there’s nothing more rewarding than bringing comfort and nourishment to those around us. So, get cooking, enjoy every bite, and keep coming back for more easy, flavorful, and soul-warming recipes! 🍛✨
Join Now!
Love this Lentil and Vegetable Curry? Don’t miss out on more delicious, easy-to-make recipes! By joining our email community, you’ll get exclusive content, bonus recipes, and meal prep tips straight to your inbox.
🔗 Subscribe now & start receiving healthy inspiration today!