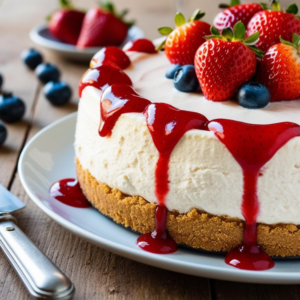
No-Bake Cheesecake
This No-Bake Cheesecake recipe is the perfect combination of creamy, smooth, and irresistibly delicious, all without needing to turn on the oven! With a buttery graham cracker crust and a versatile filling, it’s easy to customize with your favorite toppings like fresh berries, chocolate drizzle, or caramel. Whether you’re hosting a gathering, celebrating a special moment, or just treating yourself, this simple yet decadent dessert is a guaranteed crowd-pleaser. Follow this quick recipe for a stress-free, no-fuss cheesecake that looks and tastes like it came from a bakery!
Equipment
- Mixing Bowls: Use for combining ingredients for the crust and filling. At least two bowls (one for the crust and one for the filling) are recommended.
- Electric Mixer (Hand or Stand Mixer): Ideal for whipping the cream cheese and other ingredients until smooth and creamy. A stand mixer makes the process hands-free, but a hand mixer works just as well.
- Springform Pan (9-inch): A springform pan allows easy removal of the cheesecake without disturbing the crust or edges. Line the bottom with parchment paper for added convenience.
- Measuring Cups and Spoons: Use for accurately measuring ingredients like graham crackers, sugar, and cream.
- Spatula or Silicone Scraper: Perfect for scraping down the sides of the bowl to ensure all ingredients are fully mixed and for smoothing the cheesecake filling.
- Food Processor or Blender: Use to crush graham crackers into fine crumbs for the crust. If you don’t have one, you can place the crackers in a zip-top bag and crush them with a rolling pin.
- Rolling Pin (Optional): For manually crushing graham crackers if a food processor isn’t available.
- Flat-Bottomed Glass or Measuring Cup: Helps to firmly press the crust into the pan for a solid base.
- Plastic Wrap or Aluminum Foil: Used to cover the cheesecake while it chills in the fridge, keeping it fresh and preventing odors from other foods.
- Sharp Knife and Hot Water: Essential for cleanly slicing the cheesecake when serving. Dip the knife in hot water and wipe it clean between slices for a professional look.
Ingredients
- 2 Cups Graham Cracker Crumbs
- 1/2 Cup Unsalted Butter Melted
- 24 oz Cream Cheese Softened
- 1 Cup Powdered Sugar
- 1 tsp Vanilla Extract
- 1 Cup Heavy Cream
- 1 Cup Fresh Berries/Fruit For Garnish
Instructions
- In a bowl, combine graham cracker crumbs and melted butter to create the crust. Press the mixture into the bottom of a spring form pan and refrigerate while preparing the filling.
- In a large bowl, beat the softened cream cheese until smooth.
- Add powdered sugar and vanilla extract to the cream cheese, continuing to beat until well combined.
- In a separate bowl, whip the heavy cream until stiff peaks form.
- Gently fold the whipped cream into the cream cheese mixture until evenly incorporated.
- Pour the creamy filling over the prepared crust, spreading it evenly.
- Refrigerate the cheesecake for at least 4 hours or overnight to set.
- Before serving, garnish with fresh berries for a burst of color and flavor.
Notes
Storing in the Refrigerator
Since no-bake cheesecakes rely on refrigeration to set, the fridge is the perfect place to store them.-
Cover Properly:
- After your cheesecake has set, cover it tightly to prevent it from drying out or absorbing odors from other foods in the fridge. Use plastic wrap, aluminum foil, or an airtight container if your pan fits inside one.
- For a springform pan, place plastic wrap or foil snugly over the top to seal in freshness.
-
Storage Duration:
- Your no-bake cheesecake will stay fresh for up to 3-4 days in the refrigerator. For the best taste and texture, enjoy it within the first two days.
-
Toppings Matter:
- If your cheesecake has fresh fruit or whipped cream as toppings, it’s best to add those just before serving. Fresh fruit can release moisture and make the cheesecake soggy if left on too long, while whipped cream might lose its fluffiness.
-
Freezing Your No-Bake Cheesecake
Freezing is an excellent option if you want to prepare your cheesecake well in advance or save leftovers for later.-
Before Freezing:
- Ensure your cheesecake has fully set in the refrigerator first. Freezing it too soon can affect the texture and cause it to freeze unevenly.
- If you plan to add toppings like fresh fruit, whipped cream, or sauces, wait to add those until after thawing for the best results.
-
How to Freeze the Whole Cheesecake:
- Remove the outer ring of the springform pan if possible.
- Wrap the cheesecake tightly in plastic wrap, ensuring it’s completely covered. Then, wrap it again in aluminum foil for extra protection against freezer burn.
- Place the wrapped cheesecake in a freezer-safe container or bag for additional security.
-
How to Freeze Individual Slices:
- Slice the cheesecake into individual portions.
- Place each slice on a parchment-lined baking sheet and freeze for 1-2 hours, or until solid.
- Wrap each frozen slice in plastic wrap, followed by a layer of foil, and store in a freezer-safe bag or container. This method allows you to take out only what you need without defrosting the entire cheesecake.
-
Storage Duration:
- Frozen no-bake cheesecake can be stored for up to 2-3 months. After this time, it’s still safe to eat but may lose some of its creamy texture and fresh flavor.
-
Before Freezing: